


How to Do a Figure 4 Stretch to Relieve Tight Hips

Updated: Jun. 10, 2021
When your glutes and hips feel tight, the hip-opening Figure 4 stretch will give you the relief you need. Here's how to do the move—and modify it to fit your flexibility.
Stretching to loosen tight glutes and hips
Long days spent sitting in front of a desk or in a car are sure to leave you with tight, sore glutes and hips.
But it’s often not until you start feeling the byproducts of your tightness—the associated pain that can develop—that you give yourself the time to stretch.
And when you do? There’s pure relief in allowing yourself a brief release from the tension that’s been building through the outside of your hips.
It’s time to stop letting pain dictate when you stretch. Be proactive and add the Figure 4 stretch to your daily routine.
How the Figure 4 stretch can help
This simple, accessible stretch is appropriate for practically everyone and does an excellent job of targeting the gluteus medius, one of the smaller muscles of the glutes (the muscles that make up your butt). It’s largely responsible for hip abduction—moving your hip away from your body’s midline.
The gluteus medius works with other muscles in the hips, butt, and pelvis to help you do movements like side-stepping and jumping jacks, as well as external hip rotations.
Because most of our active time is spent moving forward and backward rather than side to side, these movements are often underperformed in daily life. So the muscles that are responsible for performing them are chronically tight in many people due to inactivity.
The Figure 4 stretch gives you the chance to open the hips and stretch these muscle groups. With time and practice, it may help prevent or alleviate hip pain and lower back pain.
In fact, if your doctor or physical therapist has told you you might be dealing with sciatica, the Figure 4 stretch is one he or she might prescribe to help.
The piriformis muscle, when tight or inflamed, often places pressure on the sciatic nerve, which can lead to pain, tingling, and discomfort in the hips, butt, and one or both legs.
Performing stretches that loosen up the piriformis, like the Figure 4 stretch, can help address sciatica.
Who should—and shouldn’t—do the Figure 4 stretch
The Figure 4 stretch can be performed lying, seated, or standing, which makes it an appropriate stretch for most people.
The lying position, in particular, allows people with very tight hips to find an angle that works for them.
It’s also a generally comfortable position that doesn’t require excessive mobility, balance, or strength.
That said, for individuals (like pregnant women) who have been advised not to lie flat on their backs, seated or standing Figure 4 stretches are a better choice. Just keep in mind that the standing Figure 4 stretch is performed on one leg, so it may not be appropriate for people with balance concerns.
The standing version is more manageable if you use a wall or sturdy object (like the back of a chair) to help with balance. But if you haven’t tried single-leg movements in a while, approach this modification with caution. The last thing you want to experience is a fall.
If you have had a recent injury or surgery to a lower-body joint, talk to your doctor to make sure the movement is appropriate for you to try.
You don’t want to place undue pressure or strain on your injured joint before your doctor says your body is clear to attempt a stretch or exercise.
(Learn the difference between static vs. dynamic stretching.)
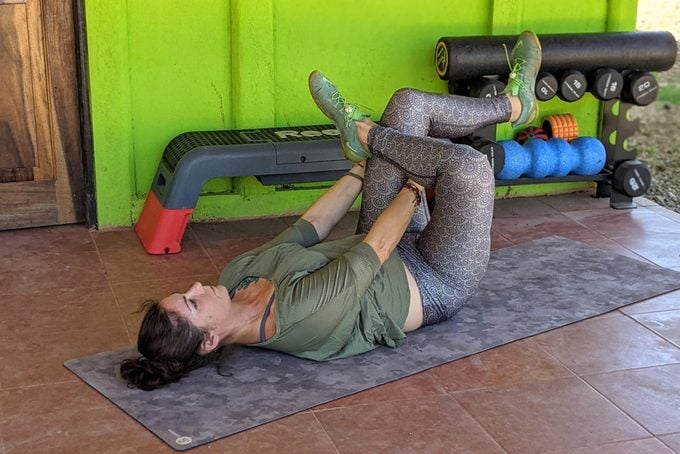
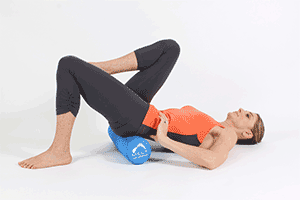
How to perform the lying Figure 4 stretch
The lying Figure 4 stretch is incredibly easy to perform.
Start on your back on a mat. Or try it on your mattress before getting out of bed in the morning.
Bend your knees and plant your feet on the mat, roughly hip-distance apart.
Cross your right leg over your left thigh, placing the outside of your right calf just above your left knee. Allow your right knee to open outward. If you saw yourself from above, you’d notice your legs make the shape of a 4.
For some people, this might be enough to get a good stretch. Or you may find that in order to cross one leg over the other, you have to move your left foot further away from your hips to make it accessible.
That’s the benefit of this lying position: there are a lot of opportunities to make adjustments based on personal flexibility and range of motion.
Try the variations below, holding each for 30 to 60 seconds before releasing and repeating on the opposite side. Perform three sets per side.
Beginner
If you feel a good stretch even with your left foot still on the floor, simply use your right hand to lightly hold your right knee open at the point of stretch and maintain this position, breathing deeply.
Intermediate
Open your hip wider by pressing your knee open with your right hand, or slowly bring your left foot closer to your hips as you hold the position.
Advanced
Looking for a deeper stretch? Lift your left foot from the floor and move your left thigh closer to your torso. Aim to get your left hip and knee to 90-degree angles, with your right knee pointing to the right side of the room.
Use both hands to grasp the back of your left thigh to hold the position at the point of stretch.
If you can, use both hands to help draw your left thigh even closer to your torso.
Common mistakes, corrections, and modifications
Most people are fine doing the Figure 4 stretch, but you can get into trouble if you force your body beyond its range of motion.
“The most common mistake is trying to force this shape. Sometimes your hips just aren’t happy,” says Jewell Singletary, a trauma-informed yoga teacher and the founding owner of Gratitude Griot in New York City. “Pushing past mobility limits to fit into this shape could potentially cause danger to the hips and knee joints.”
This is why moving your supporting foot to accommodate your personal flexibility is so important. As is allowing the knee you’re opening to stay at its comfortable limit.
“A reclined butterfly shape [with the balls of the feet together, both knees opening outward] with rolled-up towels placed under the outside of each thigh for support is a restorative alternative to the reclined Figure 4 pose,” Singletary suggests.
As long as you’re listening to your body and aren’t pushing yourself to a point of pain, the Figure 4 stretch is mostly foolproof.
That said, Cassandra Cota, the creator of Pilates People, emphasizes that it’s important to keep both feet flexed while performing the move, which helps protect the knee joint.
(Add the scorpion stretch to loosen your low back and hips.)
Seated or standing Figure 4 stretch
If you want to attempt the Figure 4 stretch in a seated or standing position, the basic rules apply. First and foremost, listen to your body.
For each move, stop once you reach a comfortable point of stretch. Then hold for 30 to 60 seconds before releasing and repeating on the opposite side. Perform three sets per side.
Seated Figure 4 stretch
Sit up tall in a sturdy chair, both feet planted roughly hip-distance apart. Keep your torso tall, core engaged, and shoulders back.
Cross your right leg over your left thigh, placing the outside of your right shin just above your left knee. Allow your right knee to open outward.
Lightly place your right hand on top of your right thigh to help open the knee to a good point of stretch.
If you can go deeper, tip forward from the hip and lean forward over your thighs, keeping your torso straight and tall as you do so.
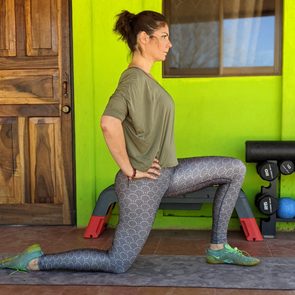
Standing Figure 4 stretch
Stand behind a sturdy chair or desk, or next to a wall.
Place your hands on the object for support. Stand tall, your feet hip-distance apart, your core engaged, and your shoulders back.
Shift your weight to your left foot and lift your right foot from the ground, crossing it over your left thigh. Allow your right hip and knee to open outward.
Keep your torso straight and tall as you press your hips back and bend your left knee, lowering into a partial squat. Stop when you feel a stretch to the outside of your right hip.
Next, try these butt workouts that are better than squats.

- Jewell Singletary, a 500-hour trauma-informed yoga teacher and the founding owner of Gratitude Griot in New York City
- Cassandra Cota, the creator of Pilates People
Originally Published: May 20, 2021