


How to Do a Pigeon Stretch to Relieve Tight Hips

Updated: Jun. 10, 2021
The pigeon stretch targets your hips to relieve tension and improve flexibility. Here's how to do it, plus modifications to fit your range of motion.
Pigeon pose for opening your hips
A pigeon stretch sounds fairly benign, doesn’t it? Well, tame-sounding yoga names don’t always adequately describe the challenge associated with certain movements.
On the upside, the challenge is worth the relief you’ll feel after striking a pigeon pose. This intermediate-level stretch is widely used to help open up the hips.
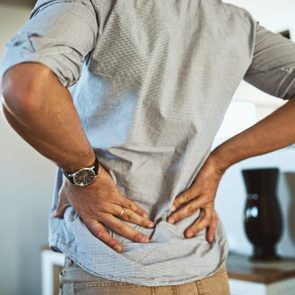
In other words, if you’ve got tight hips or hip pain, pigeon stretch (also known as eka pada rajakapotasana) is a challenge worth accepting.
Learn the ins and outs before you hit the mat to stretch.
What the pigeon stretch works
Pigeon pose stands apart from other hip stretches (like the frog stretch) because while performing the exercise, you’re targeting the outside of one hip while simultaneously targeting the front of your other hip.
“Since the external rotation of the front leg, as well as internal rotation of the back leg, is required for the stretch, pigeon pose stretches multiple muscles in the hips,” says Jamie King, founder of Flex & Flow and a 500-hour yoga teacher.
And because hip tension is so common in modern society—blame all the sitting, slouching, and sedentary activity— this yoga pose is an excellent option for increasing mobility in chronically tight joints, King says.
But that’s not all. The standard pigeon pose also helps stretch the groin and hamstrings.
And because it involves a slight backbend (back hyperextension), it elongates the spine. That, King says, can relieve pressure on the low back.
(Add these easy yoga poses to your stretch routine.)
Who should (and shouldn’t) try the pigeon stretch
Generally speaking, if your joints are healthy and you don’t have any injuries to your hips, low back, knees, or ankles, you can try this stretch.
That said, if your hips or low back are particularly tight, you may have a harder time performing the move.
It’s important to always listen to your body and stop a stretch at the end of your comfortable range of motion—stretching shouldn’t be a cause or source of pain.
Specifically, King suggests that anyone dealing with a knee injury or a sacroiliac issue (low back or hip pain) avoid the pose. If you have knee pain, talk to your doctor or physical therapist before trying this move.
“In the posture, you don’t want to feel any stress on the knee. You should feel the rotation of your femur [upper leg bone] in the hip socket and a great stretch along the front of the hip, but it shouldn’t be painful,” she says.
Warm up before trying the pigeon stretch
Aside from listening to your body and respecting your personal range of motion, the main thing to remember about the pigeon stretch is that it does require a decent amount of mobility through your hips and low back.
As such, King emphasizes that it’s best to warm up before attempting the pose.
If you’re including the pose as part of a yoga routine, chances are your instructor will work you into it with sun salutations (including the downward-facing dog pose) and easy backbends (like the cat-cow pose and sphinx pose).
If you’re performing the pose on your own, start with an active warm-up that includes these other poses as well. Or try this dynamic warm-up routine.
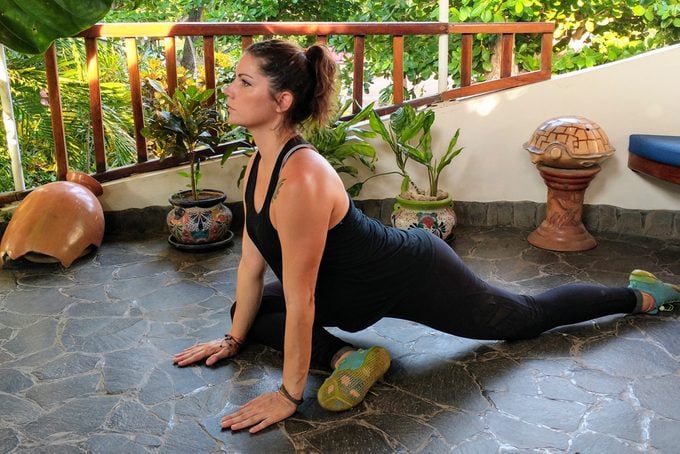
How to perform the pigeon stretch
Getting the pigeon stretch right does take some know-how. Pay close attention to the steps as you move into the pose.
Start in a plank or push-up position on a mat, with your hands beneath your shoulders, your legs extended behind you, and your core tight and straight.
You’ll be using your upper body to support yourself as you move into the pose, so keep your shoulders, triceps, and chest strong as you do so.
From this position, bend your right knee. Lift your right foot and draw your right knee toward your right elbow, as if you were going to step your foot between your arms.
Instead of placing your foot on the ground, rotate your right knee outward. Rest your knee on the mat behind and just outside of your right hand. From here, it’s important to consider your personal flexibility.
- If you’re more flexible: the outside of your right shin may be resting on the floor behind your hands, almost parallel with the front of the mat.
- If you’re less flexible: the outside of your right shin may angle backward so your right foot is positioned closer to your left hip.
With your right leg in a comfortably stretched position, lower your left knee to the mat. Untuck your toes so your left foot is pointing straight back.
It’s time for some body checks to ensure you’re in the right position.
Check the position of your left leg
It should point straight backward. If it has rotated or if it points out to the side, make an adjustment.
Check your hip position
It’s very common for your right hip to start rotating upward and your left hip to collapse downward.
You want both hips to be squared and pointing toward the front of the mat, as though they were a set of headlights.
King suggests placing rolled towels or a cushion under your right hip to provide any needed support.
Check your upper body position
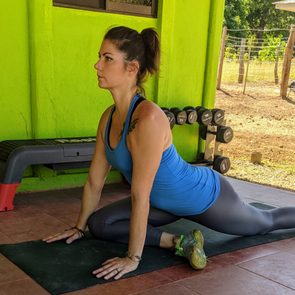
At this point, you should be feeling a nice stretch on the outside of your right hip and glute and a stretch at the front of your left hip and pelvis. If your leg and hip positions are good, move on to your upper body.
Take a deep breath in and press through your palms as you press your chest forward and look straight ahead. Extend your spine as your low back relaxes into the backbend.
Continue breathing deeply here, deepening the stretch if and when you can for roughly 20 seconds.
(These are the best butt workouts besides squats.)
How to come out of the stretch
To come out of the stretch, start by engaging your core. Tuck your left toes under and press through your palms and the ball of your left foot to lift your left knee from the ground.
Reverse the movement of your right leg, lifting your knee from the ground and rotating it inward so you can lift it and extend it behind you to return to plank position.
From here, press through your palms, chest, and shoulders, and press your hips to the ceiling to enter a downward-facing dog.
Hold for a breath, then repeat the stretch on the opposite side. Complete a total of three sets per side.
(Loosen up your piriformis with these stretches.)
Common mistakes to avoid
Because the pigeon stretch requires flexibility through the hips, those who aren’t super flexible tend to make modifications which mess up the stretch.
King sees the following mistakes when teaching the move:
“Dumping” over the bent knee
In an attempt to deepen the stretch, many people will lean forward over their front leg. This, in and of itself, isn’t incorrect.
But allowing your upper body to collapse, particularly if you’re doing it to try to force your front thigh all the way to the floor, isn’t doing you any favors.
“It’s more important that your hips both point forward like headlights,” King says. “This keeps weight even on both sides to prevent overstressing the hip’s exterior ligaments.”
Rotating or pointing the back leg outward
Many people want to take the stretch off the hip flexor of the extended leg and do so by allowing this leg to rotate externally or point out to the side.
Remember, the leg should point straight back, held in a neutral position. You never want it to rotate inward or outward.
Relaxing the front ankle
You may not be thinking much about your ankles at all, but that’s a mistake. The ankle of your front leg should be flexed, not relaxed or pointed.
As King points out, flexing this ankle helps lessen strain on your bent knee, protecting your joints as you hold the position.
(Give the scorpion stretch a try to loosen up your hips and back.)
Pigeon stretch modification
If the pigeon stretch simply doesn’t feel comfortable for you, don’t sweat it.
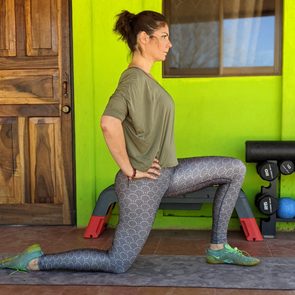
Rather, try the lying Figure 4 stretch to loosen up your butt and hips. Or do the kneeling hip flexor stretch to ease tension at the front of your hip.
Next, use these stretches for lower back pain.
- Jamie King, a 500-hour yoga instructor and founder of Flex & Flow
Originally Published: May 20, 2021