5 Shoulder Exercises You Can Do at Home
Updated: Jun. 10, 2021
Strengthen the deltoids and surrounding muscles by doing these shoulder exercises at home. They can help prevent injury to your shoulder joint.
The importance of using your shoulders
Here’s a quick test for you: Go open a door, put your dishes away on your shelves, stir a pot, pull on a sweatshirt, or push yourself up from lying on your stomach. Pretty straightforward and simple, right?
Now try to do any of those moves without using the muscles of your shoulders. Suddenly they’re not so easy, are they?
It’s not that you can’t figure out how to get around in life without the use of your shoulders—for instance, you can always open a door with your foot. But it’s going to be a lot harder to perform basic daily tasks, never mind big tasks that require upper body strength and force.
The reality is, shoulders are kind of the unsung heroes of your upper body’s anatomy. You may not put a lot of thought into their use or purpose, focusing more on the muscles of your chest or upper back. But without these incredibly complex joints and the muscles that supports their movement, life wouldn’t function the way you’ve grown accustomed to.
(Build more muscle with these upper body exercises with dumbells.)
This is exactly why it’s so important to include shoulder work in your weekly routine—to support and strengthen the muscles that allow you to perform important daily tasks and, of course, participate in sports and recreational activities, too. (Here are the medical reasons for your shoulder pain.)
Here’s everything you need to know about the anatomy of your shoulder, the most mobile joint in the body, and the best shoulder exercises you can do at home.
Avoiding shoulder injury
The shoulder is the most mobile joint in the entire body. It moves in every plane of motion: lifting, lowering, rotating, abducting (moving away from the body), and adducting (moving closer to the body) at innumerable joint angles. This range of motion allows you to do all of the daily tasks you largely take for granted without skipping a beat.
That said, the extreme mobility of the shoulder joint also makes it incredibly unstable and prone to inflammation and injury.
This is often exacerbated when the muscles that surround and support the shoulder develop imbalances, either from underuse, overuse, or some combination thereof. Some of these muscles include those of the chest and upper back, as well as the stabilizing rotator cuff muscles, and the largest, strongest shoulder muscle, the deltoid.
(Here’s why you may be experiencing pain between shoulder blades.)
For instance, someone who only performs chest exercises when hitting the gym is likely to overdevelop the chest and the anterior (front portion) of the deltoid. At the same time, they’re neglecting the upper back and the middle and back portions of the deltoid. This can affect range of motion and lead to injury over time.
(Make sure your shoulders stay limber with these deltoid stretches.)
Shoulder exercises to do at home
It’s important to have a structured shoulder workout that’s designed to target each arm independently while hitting all three heads of the deltoid in compound and isolation exercises. This type of structured routine can help you correct side-to-side differences in muscle strength and mobility. It’ll also correct imbalances that may exist between the front and back sides of your body.
“Shoulders provide balance for all types of movements, and they’re one of the body parts people most often neglect while exercising,” says Ben Rose, certified personal trainer and cofounder of Trainer Academy. “It’s recommended that you pay extra attention to your shoulder muscles when doing exercises at home.”
The simple, home-based workout that follows requires nothing more than a set of dumbbells and a long, looped resistance band. Incorporate it into your routine at least once a week, although it’s best to complete the exercises twice a week.
Allow for at least one full day of rest between workouts. You can include the exercises as part of a larger, upper body routine or a full body routine.
(Try these upper body resistance band moves.)
Incline dumbbell bench press
You may think of the incline bench press as a chest exercise, which, of course, it is. But the greater the incline of the bench when performing the press, the more you’ll end up working your shoulders, particularly the front portion of the deltoid (the anterior deltoid).
Plus, when you use a set of dumbbells to perform the press (rather than a barbell or a machine), you force each shoulder to lift the weight independently. This helps to correct side-to-side muscle imbalances and strengthen the smaller, supporting muscles of the shoulder joint, which can help prevent injury.
(Do your shoulders feel achy? Try these shoulder pain exercises.)
How to do it
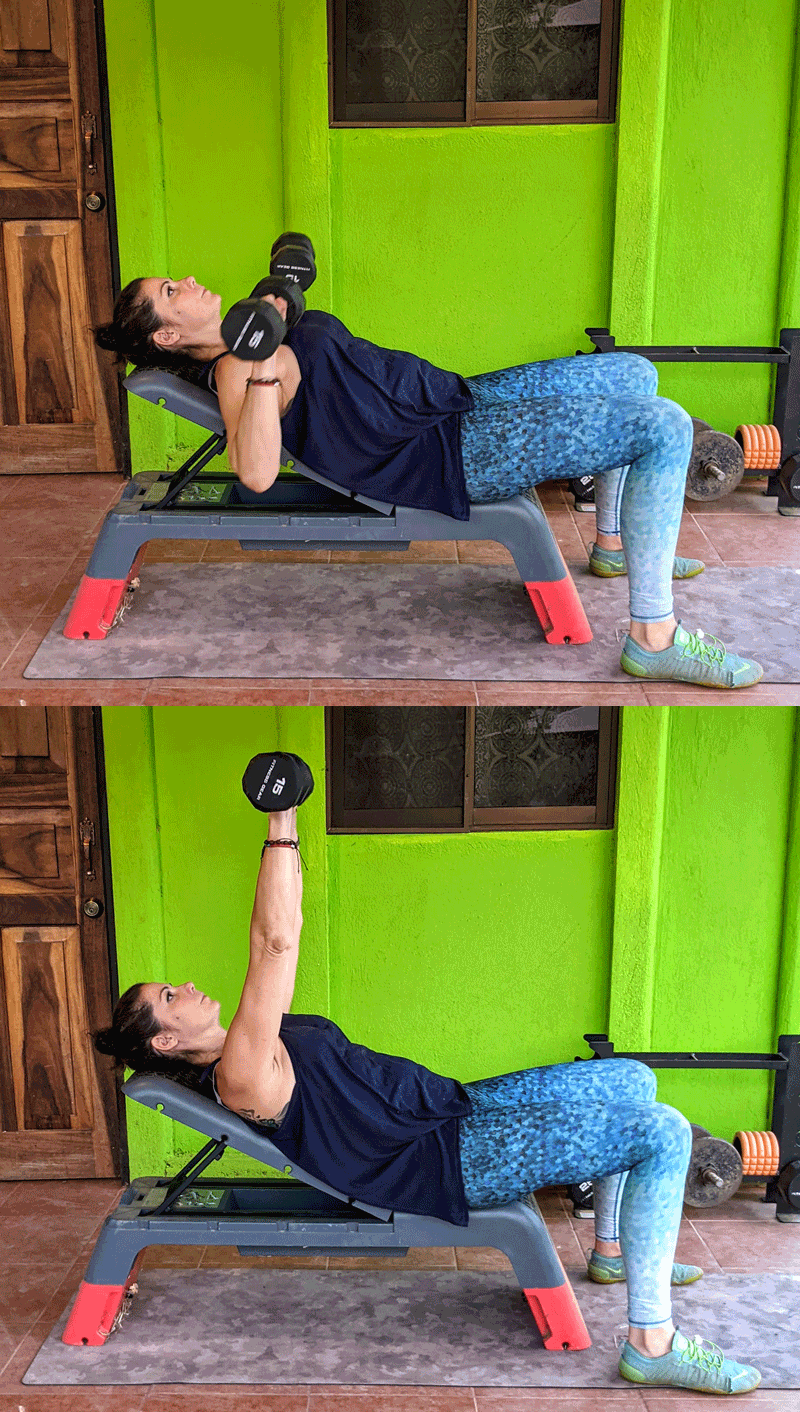
To perform the incline press, lie back on a bench that’s inclined between 30 and 60 degrees. Remember, the greater the incline, the more you’ll target your shoulders and the less weight you should try to lift because you’ll have less assistance from the pecs to perform the exercise. Choose dumbbells that weigh enough to make the last one or two reps hard, but not impossible, to perform with perfect form.
Hold a dumbbell in each hand at your shoulders, your palms facing away from your face. Take a breath in and tighten your core. In a single movement, exhale and press both dumbbells straight up over your chest, straightening your elbows completely so that your arms form an “11” over your chest. The heads of the dumbbells should be close, almost touching.
As you take your next breath in, reverse the movement, lowering the dumbbells steadily back to the starting position. Complete a total of two to three sets of 10 to 12 repetitions.
Arnold dumbbell shoulder press
The Arnold press (named after former Mr. Olympia/movie star/former California Governor Arnold Schwarzenegger), is an excellent alternative to a standard shoulder press because it hits all three heads of the deltoid. It also requires external shoulder rotation and overhead extension. This targets and works the smaller and supporting muscle groups of the shoulders and upper back.
The catch, of course, is that if you have limited range of motion of the shoulder or if you have inflammation in your joint, performing these movements with added resistance could cause pain. If you try the exercise and experience pain, put the weights down and skip the move. You’ll still target your entire shoulder musculature with the rest of the moves on this list.
(These are the pain symptoms to never ignore.)
How to do it
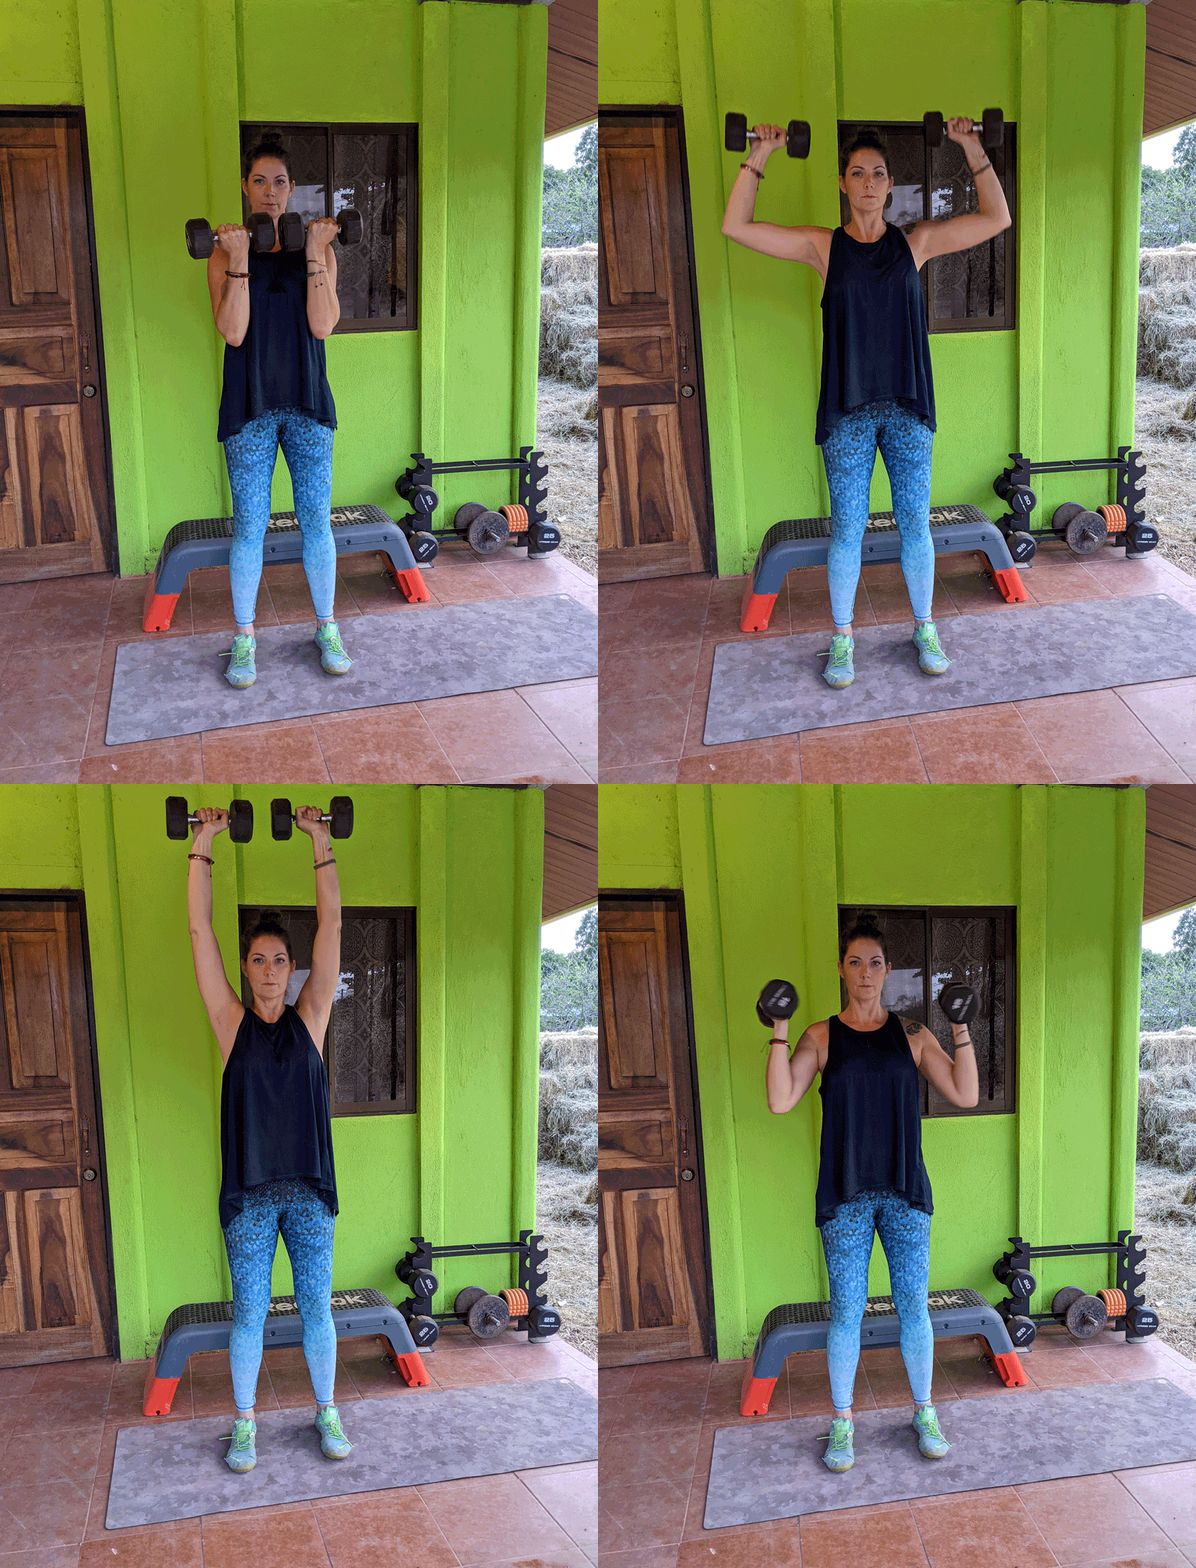
Stand tall, your feet roughly hip-distance apart. Hold a dumbbell in each hand—use less weight than you would usually use for an overhead shoulder press.
Position the dumbbells directly in front of your shoulders with your elbows bent and palms facing your shoulders. Put a very slight bend in your knees and engage your core to help keep your core and lower body completely steady as you perform the move.
Take a breath in. As you exhale, press the dumbbells directly overhead, straightening your elbows and rotating your palms to face outward. At the top of the exercise, your elbows will fully extend overhead and your palms will face forward, away from your body.
Pause for a beat, then reverse the movement, lowering the dumbbells with control as you rotate your wrists internally. End the move at the starting position, with the dumbbells in front of your shoulders.
Perform eight to 12 repetitions. Complete two or three total sets.
Banded face pull
The head of the deltoid that is often overlooked is the posterior head, which is on the back side of your shoulder. If it’s neglected, you can end up with a muscle imbalance and, as a result, instability or changes in support that can lead to injury. The banded face pull is an easy way to target the back portion of your shoulder from the comfort of your home.
How to do it
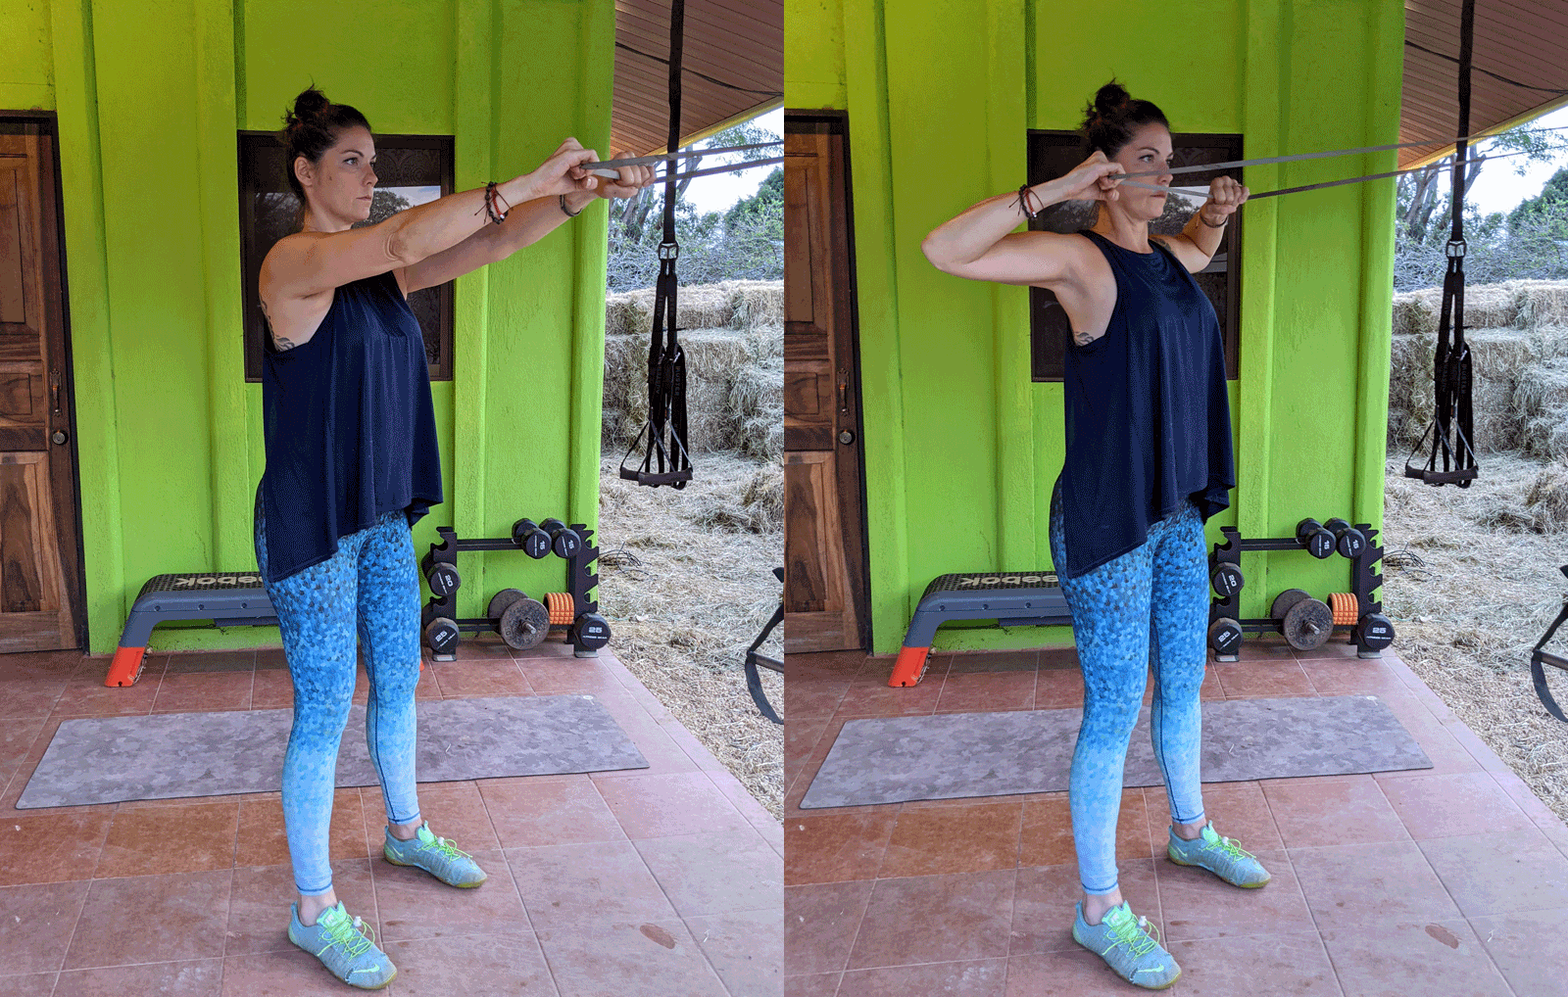
Tie a heavy resistance band around a sturdy post at roughly the same height as your head. Stand back from the post, holding the ends of the resistance band with both hands so the band is taut. Keep your arms fully extended in front of your chest, palms facing down.
Bend your knees slightly. Tighten your core to help prevent your lower body and torso from moving as you perform the exercise.
Take a breath in. As you exhale, squeeze your shoulder blades together and pull the band directly toward your face, bending your elbows and engaging the back of your shoulders to perform the movement. Just before the band touches your face, stop and hold for a second.
After a beat, very steadily reverse the movement, extending your elbows to the starting position. The benefit of working with resistance bands is you experience the greatest resistance at exactly this part of the movement.
Perform 10 to 15 repetitions. The last one or two reps should be hard, but not impossible, to perform with perfect form. Complete a total of two to three sets.
(Try these upper body exercises with no weights.)
Banded lateral raise
Lateral raises are an excellent way to target the medial head of the deltoid. This runs across the top of the shoulder, between the anterior and posterior heads.
Because this exercise isolates one of the heads of the deltoid, you need to use less resistance than you would if you were performing an exercise that targets all deltoid muscles at once, like the Arnold press. This makes resistance bands an excellent (and affordable) way to target the muscle at home.
You can adjust your grip on the resistance band to make the exercise easier or more difficult. Try lengthening or shortening the portion of the band you’re using band as needed. The top of the exercise—when your arm is lifted and extended—is the point at which you’ll experience the greatest level of resistance.
(Here’s how to get stronger arms.)
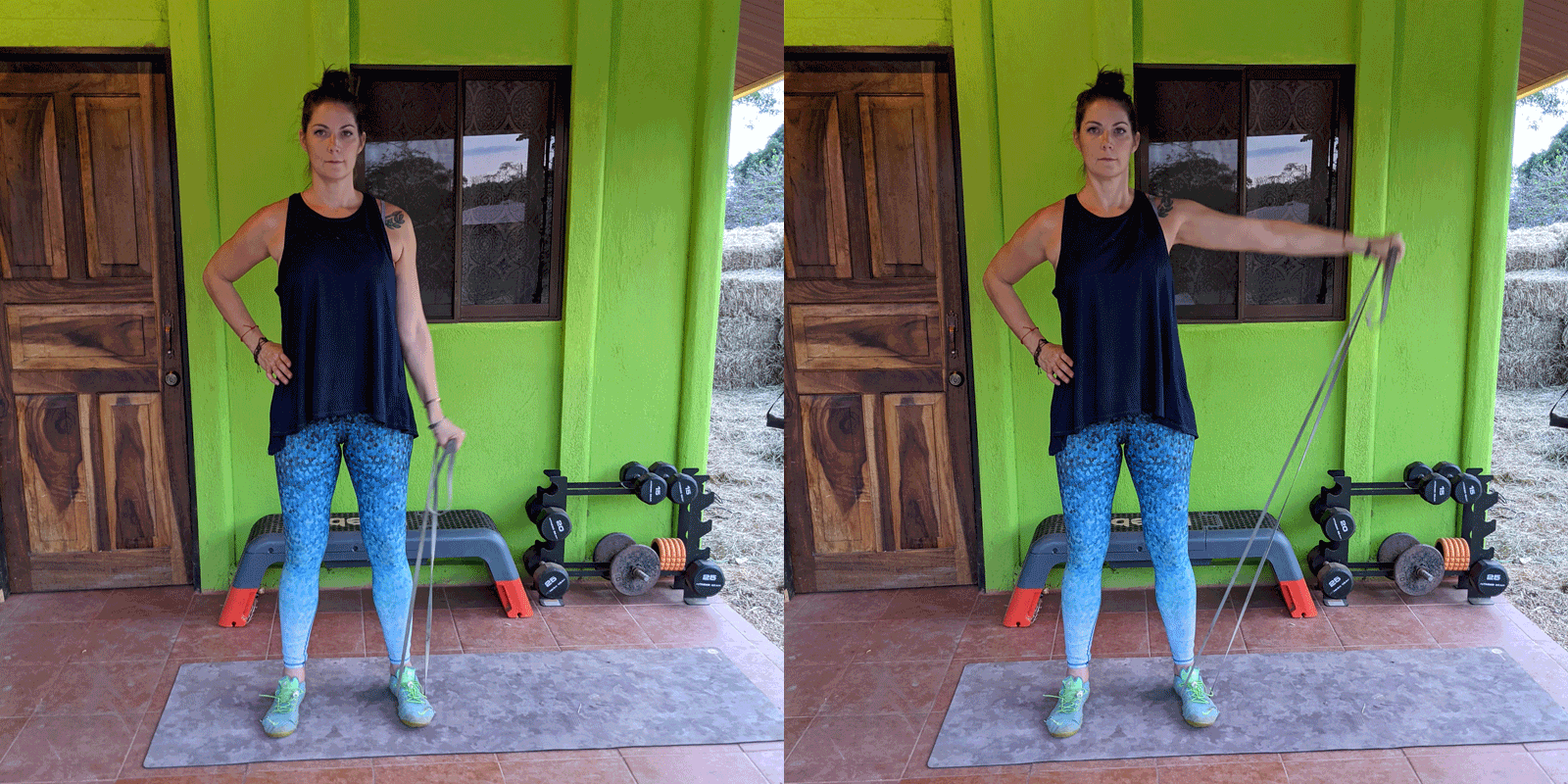
How to do it
Stand with your feet roughly hip-distance apart, your knees slightly bent and core engaged. Loop a resistance band around your left foot and hold the ends of the band in your left hand at your side. The band should be tight but not taut. Your palm should face toward the outside of your thigh.
Roll your shoulders back and check your posture. Make sure your ears are aligned with your shoulders, hips, and ankles. Take a breath in.
As you exhale, raise your left arm straight up and out to the side until it is parallel to the ground. Hold for a beat. As you breathe in again, lower your arm back to your side in a slow, controlled motion.
Perform eight to 12 reps before switching sides. Aim to complete two to three sets per arm.
Banded front raise
You’ll finish your shoulder workout by targeting the anterior head of your deltoid with a banded front raise. This movement is very similar to the lateral raise, but you’re lifting and lowering your arm directly in front of your body, rather than out to the side.
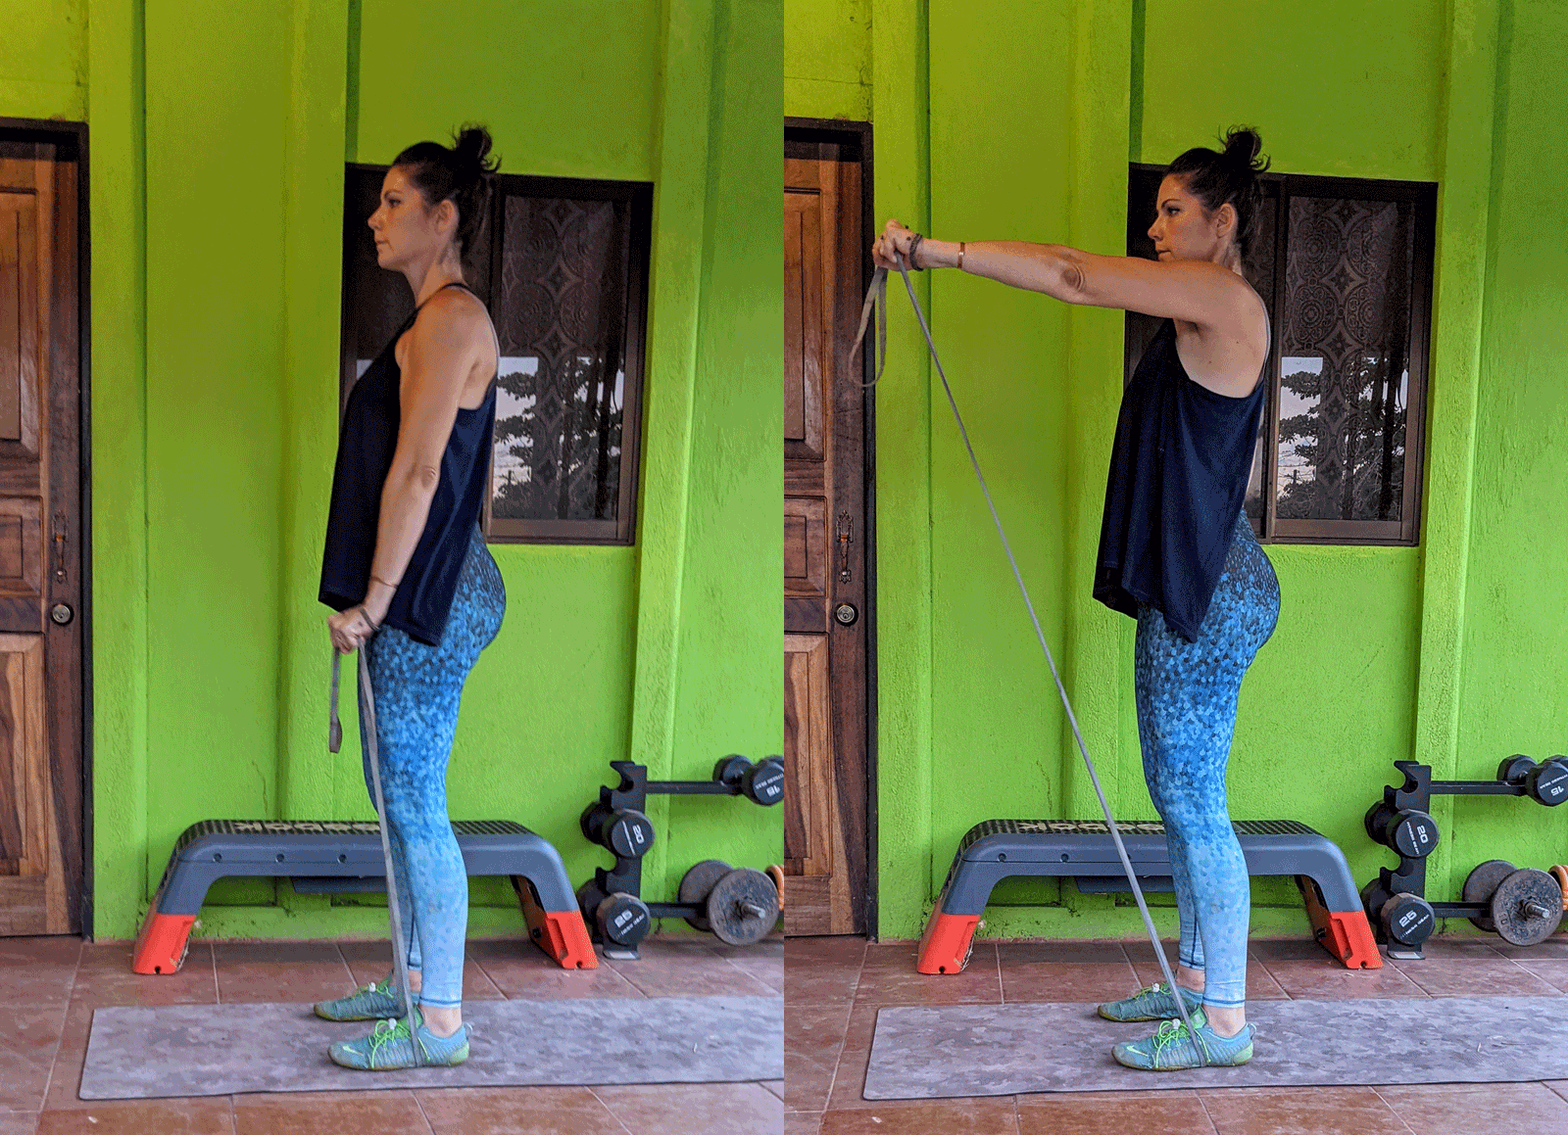
How to do it
Stand with your feet roughly hip distance apart, your knees slightly bent and core engaged. Loop the band around your left foot, holding the other end of the band in your left hand at your side. The band should be tight but not taut. Your palm should face the front of your left thigh.
Check your posture to make sure your shoulders are rolled down and back. Keep your ears aligned with your shoulders, hips, and knees.
Take a breath in and tighten your core. As you exhale, lift your left arm directly in front of your body, keeping your elbow straight. Stop when your arm is parallel to the floor.
Hold for a beat. In a slow and controlled movement, lower your arm back to the starting position.
Perform eight to 12 reps before switching sides. Aim to complete two to three sets per arm.
Next, got back pain? Try these stretches for upper back pain.


