10 Beginner-Friendly Exercises You Can Do at Home Right Now
Updated: Oct. 16, 2021
You don't have to buy a lot of equipment to start a home exercise routine. Try this beginner-friendly workout with some of the best exercises for beginners.
Working out 101
You don’t have to join a gym or invest in a lot of exercise equipment to start an exercise routine. If you’re not currently exercising, it’s better to start with something now than putting it off.
And here’s the good news: If you associate exercise with a sweat-fest of pain, heavy breathing, and a week of soreness afterward, it doesn’t need to be that way.
A solid, beginner-friendly program will help ease you into a routine, slowly ramping up the challenge and intensity at a sustainable rate. The last thing you need with a new exercise program is a new injury, too. So use these exercises for beginners (they target every major muscle group) as a way to start today.
What qualifies as a ‘beginner’ exercise?
One thing that’s important to remember is there’s no such thing as a “bad” exercise, but there might be a bad exercise for you. And that’s something to keep in mind as you start a new workout or try these exercises for beginners.
You might find that some beginner-friendly exercises don’t work for you, especially if you’ve had prior injuries, illnesses, or changes in mobility. That said, beginner exercises are generally accessible and well-tolerated by most healthy individuals.
“A beginner exercise should ‘ease’ you into the workout, meaning it should be manageable without pushing yourself beyond your capabilities,” says Lee Jay, a personal trainer and Pilates instructor in New York.
“It should be suitable for someone with no prior knowledge of the exercise.”
Many beginner exercises are modifications of advanced moves, making them an excellent place to start. As you master the basics, you can transfer your new knowledge and strength to move on to more challenging moves.
“If you plan to work up to box jumps, which are considered an advanced exercise, you’d want to start at the beginner stage of mastering the basics of a jump,” Jay says.
“[Practice] how to propel up, where to drive from, how to land with correct form to avoid injury, and how to follow correct breathing patterns.”
And, of course, you’d want to build the appropriate strength in corresponding muscle groups. So using this example, you may want to start with something like a chair squat to build strength and work on the form necessary to squat down and propel yourself upward.
How to start (and stick to) a home-based routine
Of course, it’s one thing to want to start a new workout routine, but it’s an entirely different thing to start (and maintain) a new habit. Especially a habit that may not always be physically comfortable.
The first thing to remember is something is better than nothing. Missing one workout doesn’t mean you should quit altogether, and it’s important to remember your “why.” As in, why do you want to start a routine in the first place?
It needs to be a reason that’s truly motivating, like having the energy to play with your kids, or the strength and stamina to take that hiking trip you’ve always wanted to take.
Limit distractions
But starting a home-based routine comes with its own benefits and challenges that you need to be aware of before diving in.
“Exercising at home is an ideal way to make sure you move your body,” says PJ Shirdan, a certified personal trainer for FightCamp, an at-home boxing workout.
“There are far fewer obstacles in your way, like traffic, weather, or a long commute.”
But there are other distractions, like your family, the call of your favorite TV show, and that pile of laundry you know you need to get done. For these reasons, it’s important to approach your workout as though it were taking place at a different location.
Schedule it
“As with any fitness routine, you should schedule it. Write it in your calendar, choose a time of day when you’ll have the least distractions, and get an accountability partner,” Shirdan says.
He even suggests getting a friend to meet you at your house to tackle the workout together. It doesn’t matter if it’s exercises for beginners or a tough workout class; finding the time is key.
Find exercises you enjoy
And, of course, try a new routine for a few weeks, and if you aren’t enjoying it, try something new.
“Often, people choose a mode of fitness that they think they’ll like. When they realize they don’t love it, they quit and give up on exercise entirely,” Shirdan says.
“Try a few things to see what feels the best in your body. Most gyms and online fitness companies offer trial weeks. Try as many as you need to until you find one you love.”
If there’s any silver lining from the pandemic, it’s that there are more online fitness options than ever before. So if you don’t enjoy these exercises for beginners, you can try another form of movement.
If you find you need something more challenging, or you want to try your hand at something new, whether it’s Pilates, yoga, or boxing, you’re just a few clicks away from the resources you need to make it happen.
(Check out these online fitness classes, stat.)
The best exercises for beginners
These 10 exercises are simple moves you can do at home right now. They require no equipment aside from water bottles—a one-liter bottle is roughly two pounds, a gallon container is a little more than eight pounds; choose a size that works for you.
Since these are primarily strength-training moves, start by incorporating them into your routine twice per week. On other days, you accumulate roughly 20 to 30 minutes of cardio activity—walking is great! And when you feel ready, progress your exercises or increase your time as desired.
“We can all reach our goals bit by bit, so take it one step at a time,” Jay says.
“When embarking on a new program, you’re starting from zero, so you only have room to improve! Patience and consistency are both key to elevating your fitness goals and moving on to the next achievement.”
Add these quick workout moves to your routine to get started.
Modified jumping jacks
Exercises for beginners are simple. Modified jumping jacks are a great way to warm up before a strength-training workout or to add short bouts of cardio between exercises to keep your heart rate up.
The modified version ensures that one foot remains in contact with the ground at all times to reduce the impact of the exercise and make it more accessible for more people.
How to do a modified jumping jack:
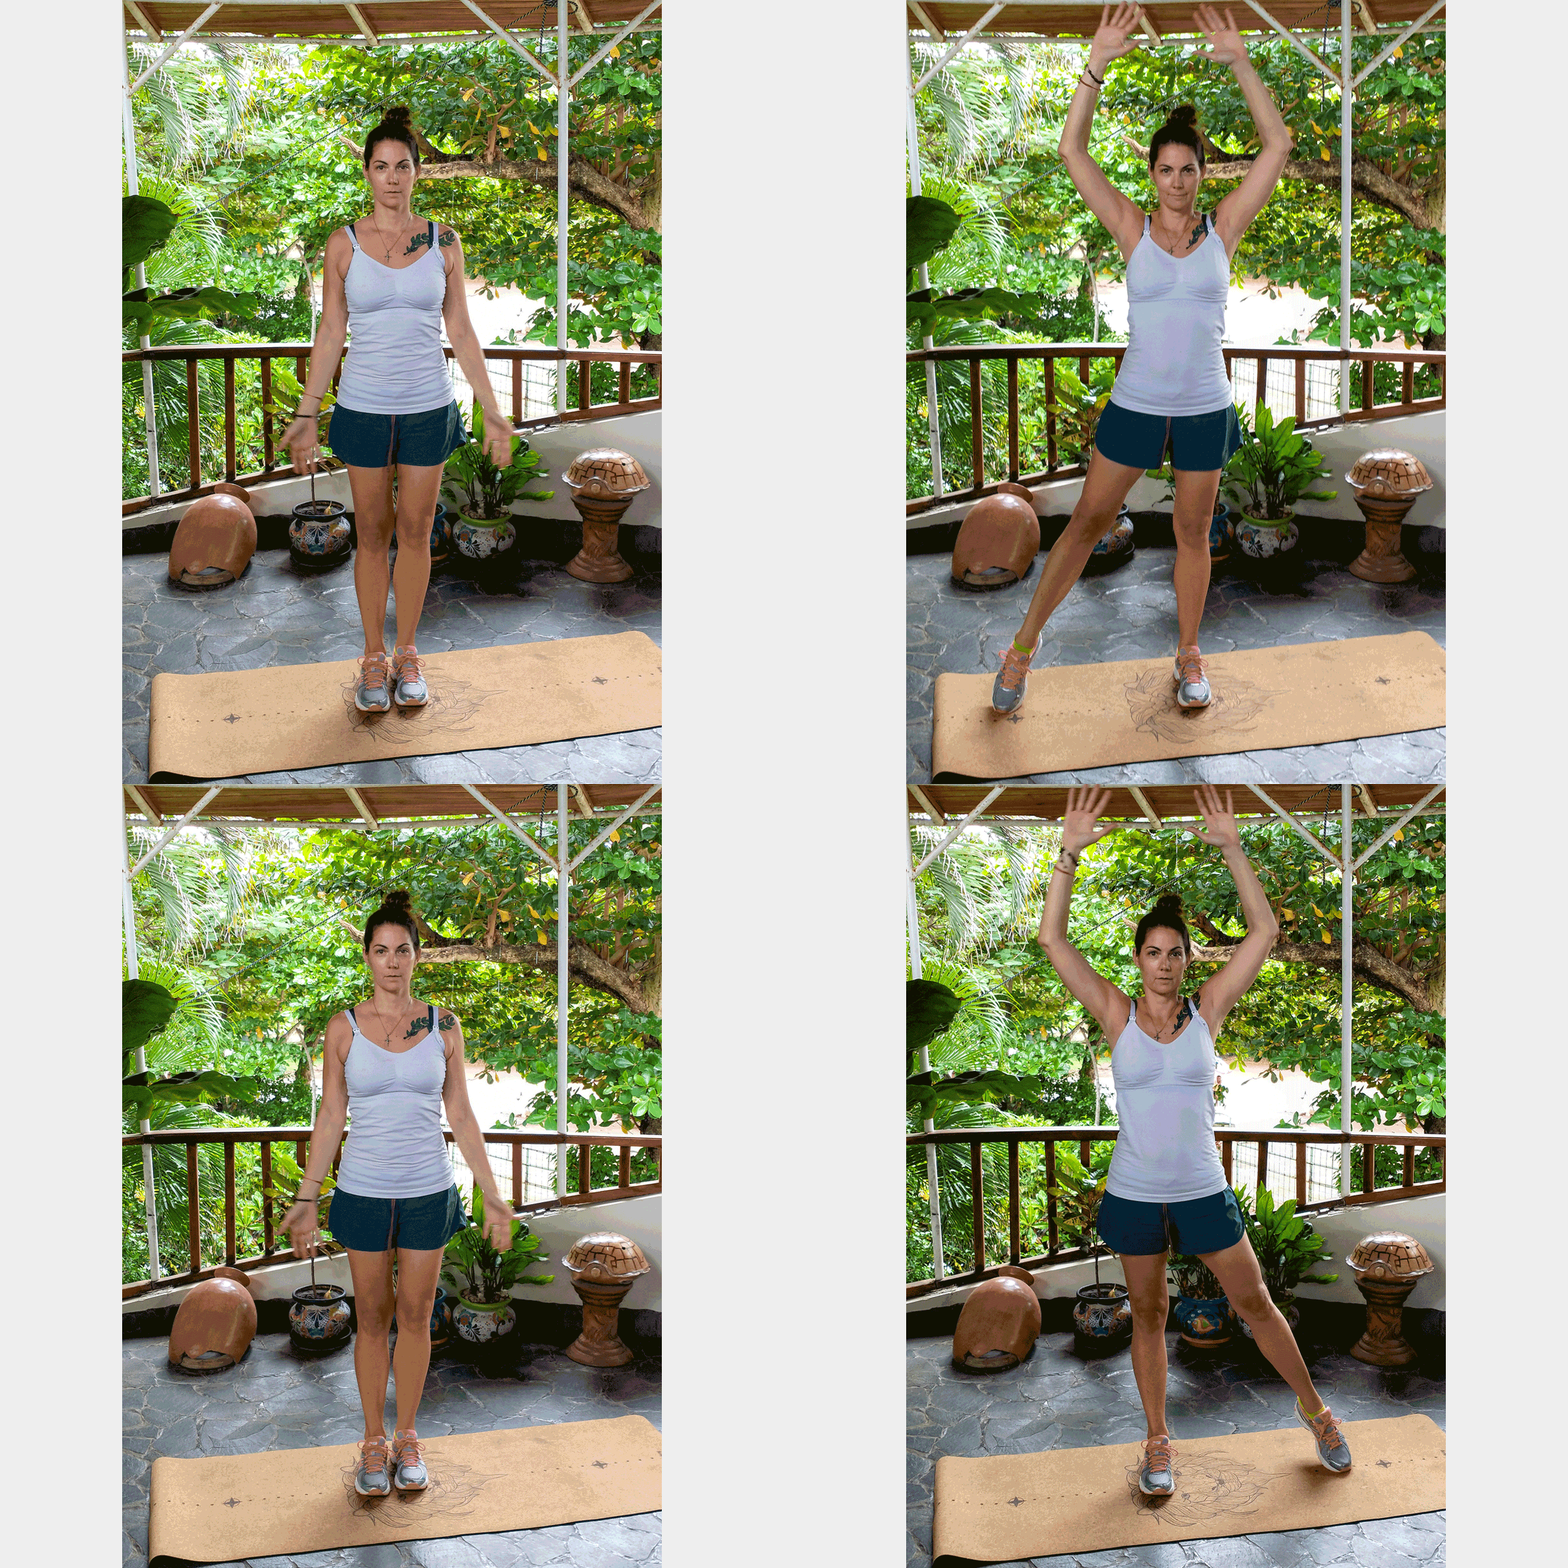
Stand with your feet together, your arms at your sides. Swing your arms up over your head as you simultaneously step your right foot out to the side. Next, swing your arms back down to your sides as you return your right foot to the center.
Swing your arms up over your head again, this time stepping your left foot out to the side. Again, swing your arms back down to your sides as you return your left foot to the center.
Continue performing the modified jumping jacks. Aim for at least 30 to 60 seconds before resting for 15 to 30 seconds and repeating the exercise.
(Try more at-home cardio options.)
Chair squat
A chair squat is one of the best squat exercises because it works all the major muscle groups of your lower body, including your glutes, quadriceps, hamstrings, and even your calves. It also works your core when done correctly, as you have to engage your abdomen and back to maintain an upright torso as you squat down.
A chair squat is also an excellent way to learn proper squat form, as it encourages you to start the movement by bending at the hips, rather than the knees.
How to do a chair squat:
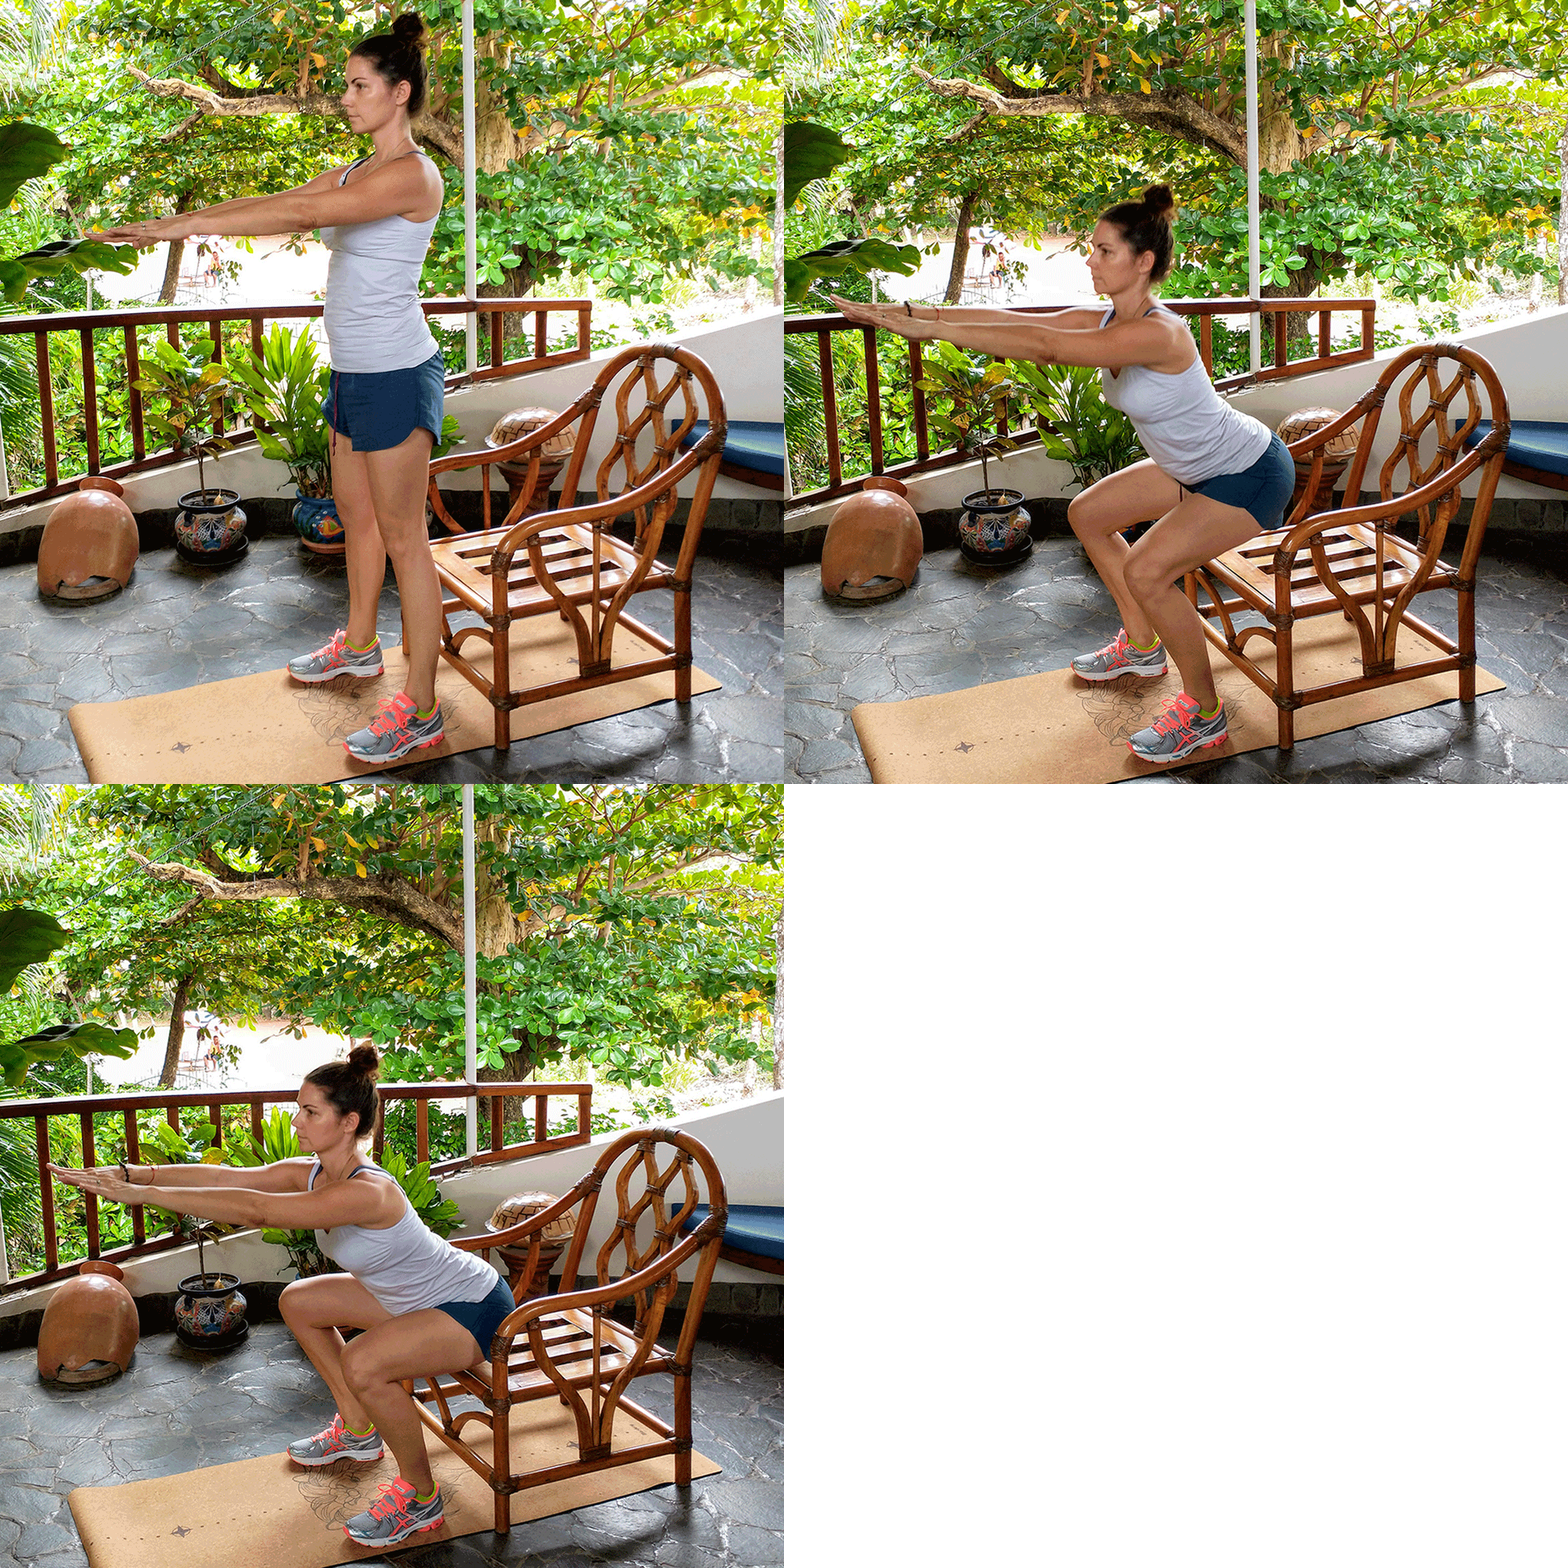
Stand directly in front of a sturdy chair, your back to the seat, your feet slightly wider than hip-distance apart, your toes angled slightly outward. Extend your arms in front of your chest—the goal is to keep them parallel to the ground the entire time as a reminder to keep your chest up.
Engage your core and press your hips back, lowering your glutes toward the seat. As you move, bend your knees to help lower yourself in a controlled fashion to the chair. Keep your knees aligned with your toes. Avoid tipping your torso forward from the tips—you want to keep your upper body upright and tall.
When your glutes touch the chair, you can sit completely before reversing the movement and returning to standing, or you can simply tap your glutes to the seat before returning to standing. Aim to perform at least two sets of eight to 12 repetitions.
(This is how many squats you need to do to see results.)
Wall push-up
That’s right, a variation on push-ups is one of the best exercises for beginners. Just as a traditional push-up is a great exercise for your chest, triceps, shoulders, and core, a wall push-up is, too, but it’s more accessible for all ability levels.
And if you find a wall push-up is too easy, but you’re still not ready for a push-up from the floor, you can always use a sturdy counter or the back of a couch as the place to put your hands, performing the exercise at an angle for a slightly more difficult challenge.
How to do a wall push-up:
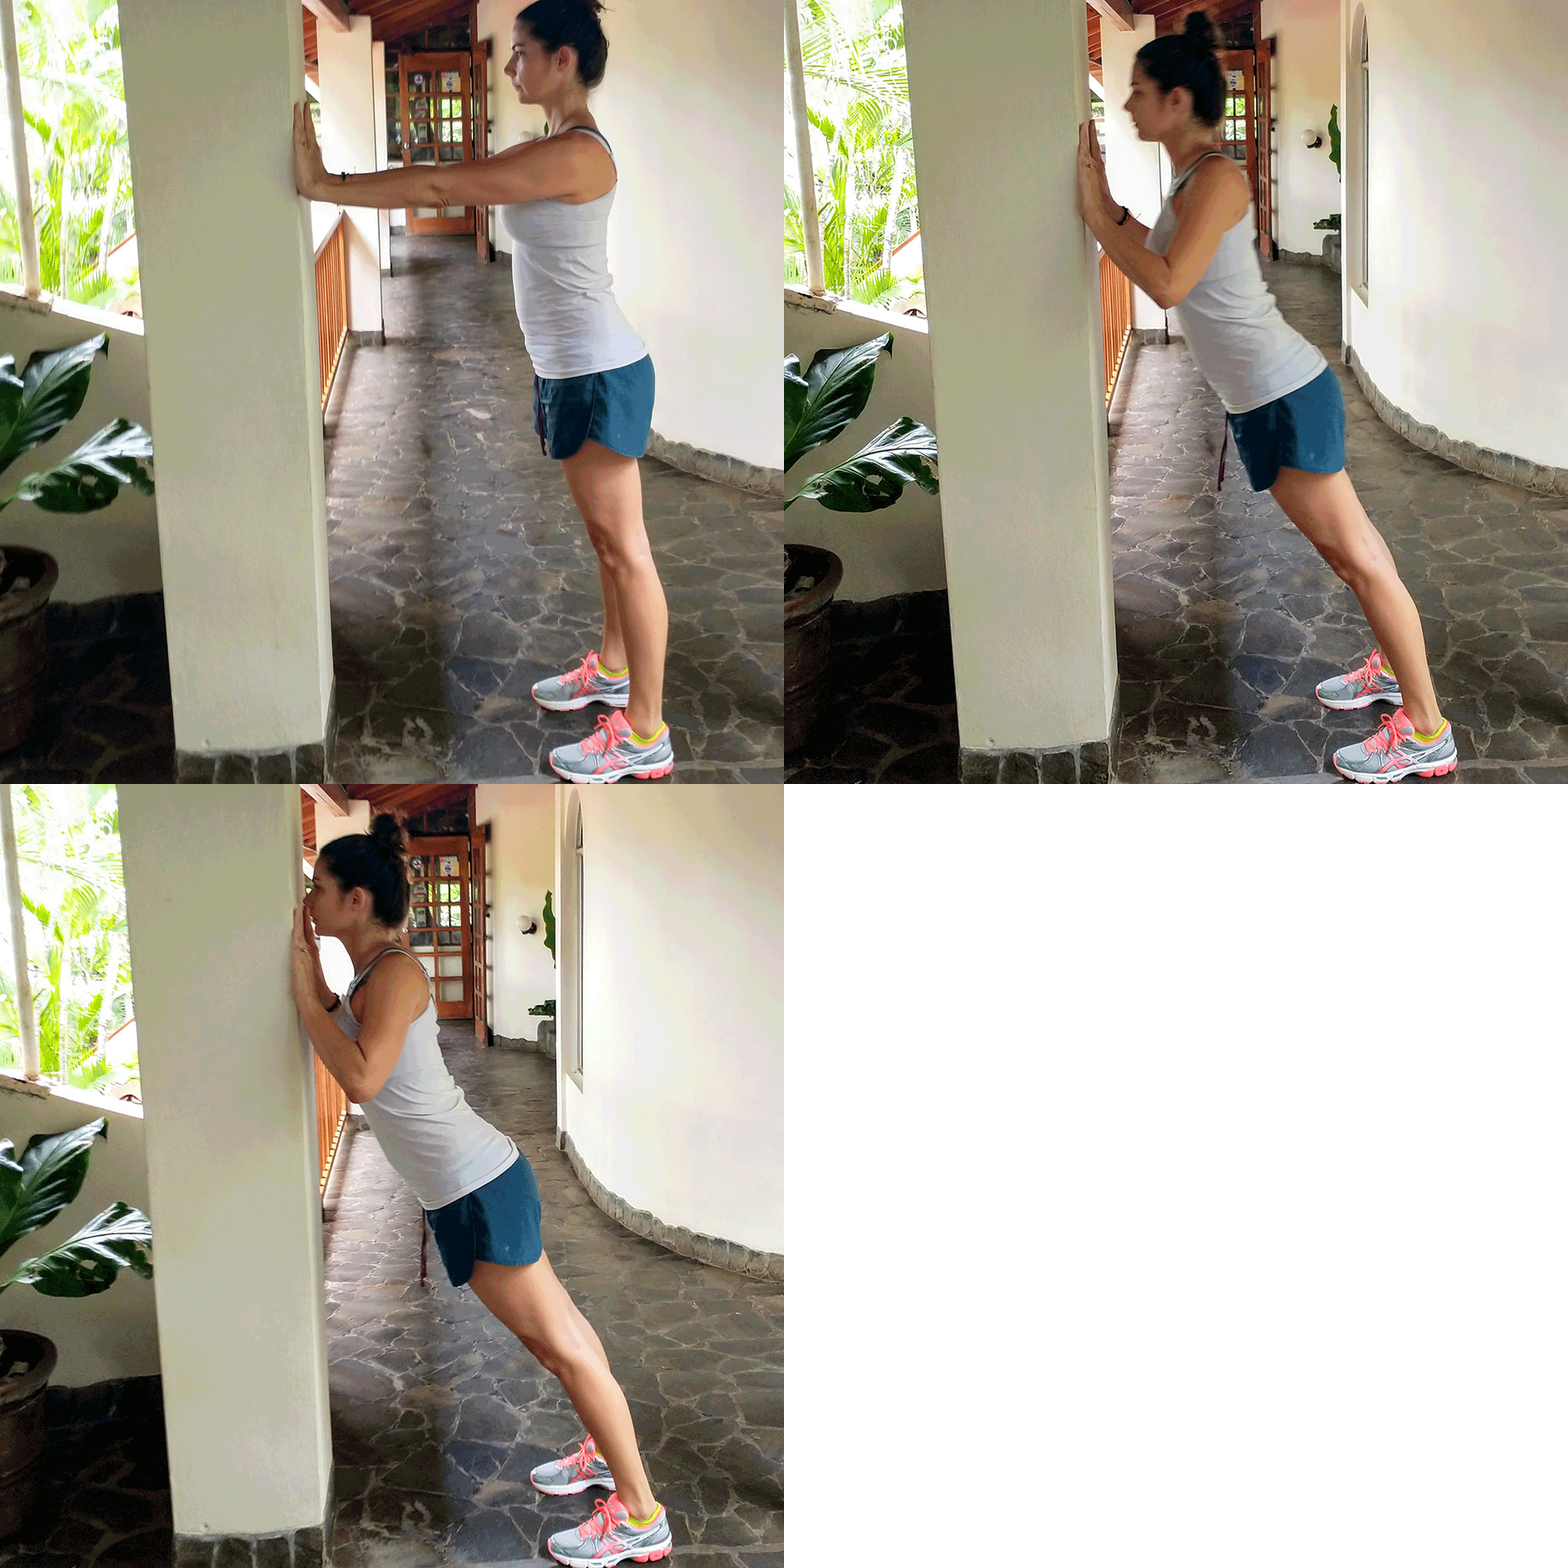
Stand facing a wall, your feet hip-distance apart. Place your palms on the wall roughly shoulder-distance apart, slightly lower than your shoulders.
Lean into your palms and begin bending your elbows, moving your chest toward the wall. You want your elbows to bend at 45-degree angles from your torso, so they aren’t hugging your torso or splaying outward from your shoulders.
When your chest and shoulders are close to the wall, reverse the movement and extend your elbows, pressing your body back to the starting position. Complete two sets of eight to 12 repetitions.
(Here’s how many push-ups to do.)
Bent-over water bottle row
Sometimes people who are strength training at home overlook working out their backs if they don’t have special equipment, but a bent-over row is a good way to target all the major muscle groups of your middle to upper back.
How to do a bent-over water bottle row:
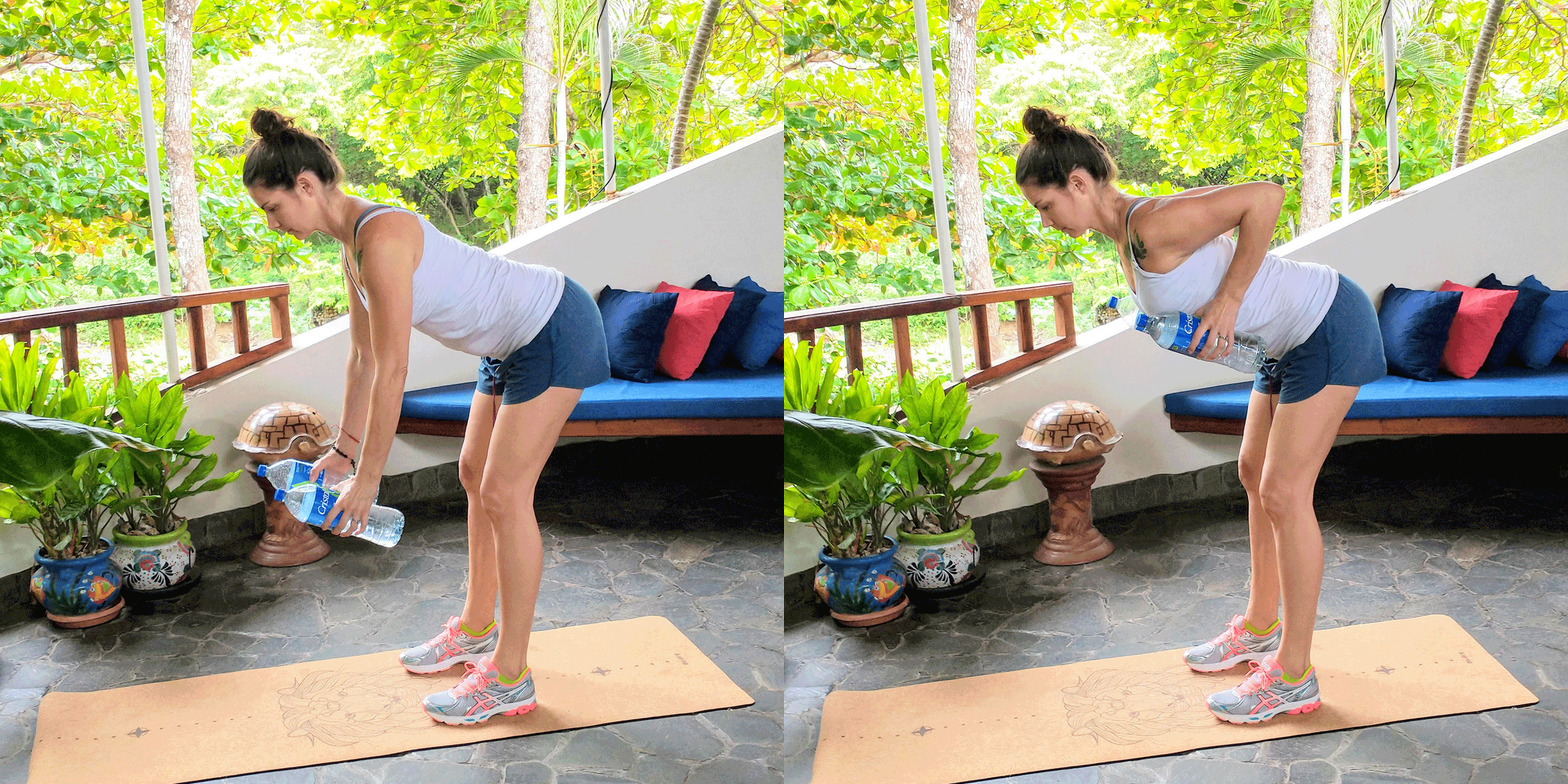
Hold a water bottle in each hand with your feet roughly shoulder-distance apart, your knees slightly bent. Engage your core and check your posture—your ears should align above your shoulders, hips, knees, and heels.
Keeping your upper body perfectly aligned (not slouching forward of allowing your shoulders or back to hunch), tip forward from the hips as you press your glutes back to lean your torso toward the floor.
Stop when you feel you can’t maintain perfect posture if you lean any farther forward. Allow your arms to hang down from your shoulders, keeping them engaged.
From this position, squeeze your shoulder blades together and “row” the water bottles to your chest, your upper arms “hugging” your sides until your elbows are slightly higher than your back. Hold for a beat, then reverse the movement, lowering the bottles with control back to the starting position. Complete two sets of 8 to 12 repetitions.
(Give these back exercises a try.)
Assisted lunge
Lunges are another excellent lower-body move that challenge every major muscle group, but they require coordination and balance that isn’t always beginner-friendly.
Performing an assisted lunge is one way to start testing the waters of this compound exercise to start working your way to more challenging variations.
How to do an assisted lunge:
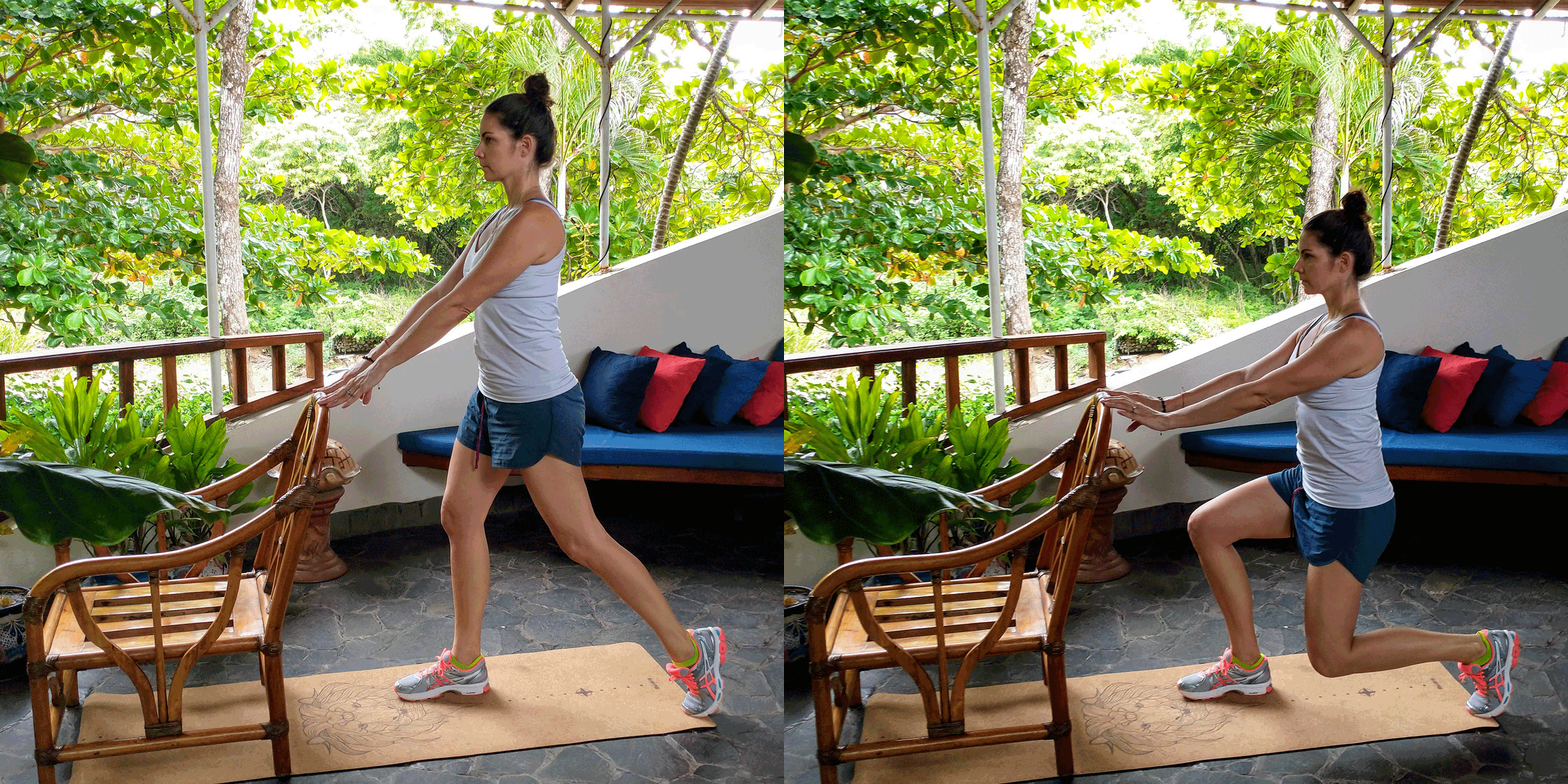
Stand facing a sturdy counter or the back of your couch with your feet roughly hip-distance apart. Place your hands lightly on the surface for balance.
Engage your core, tuck your hips under slightly, keep your torso upright and tall, take a step backward with your right leg, and plant the ball of your right foot on the ground.
Start bending your right knee, lowering it toward the floor, and as you bend your right knee, allow your left knee to bend (staying aligned with, and behind, your left toes) to accommodate the movement.
The goal is to get to the point where your right knee stops just before touching the floor, but for now, stop when you feel you can’t maintain proper form. Press through both feet and extend both knees to return to standing. Perform three sets of eight to 12 repetitions per side.
(Work your legs at home with these moves.)
Glute bridge
The glute bridge is one of the best butt exercises and exercises for beginners. But it also strengthens the hamstrings and core.
How to do a glute bridge:
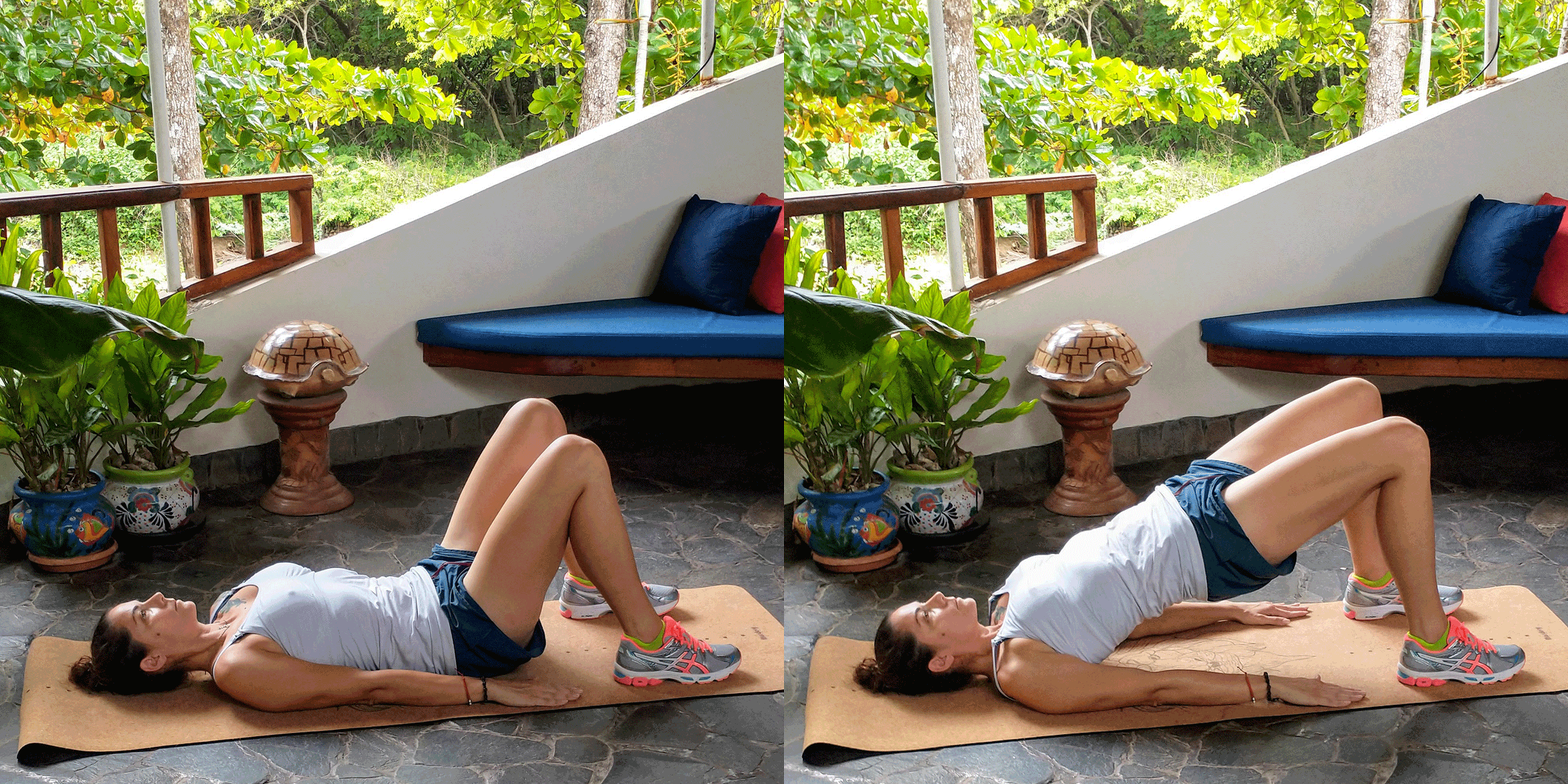
Lie on your back, your knees bent, feet flat on the floor. Your feet should be roughly hip-distance apart. Place your palms face down at your sides. Engage your core, pressing your low back into the ground.
From here, squeeze your glutes and press your hips toward the ceiling until your body forms a straight, diagonal line from your knees to your shoulder blades.
Hold the position for a second, then with control, lower your glutes back to the floor. Perform two sets of 15 to 20 repetitions.
Seated water bottle shoulder press
The seated water bottle shoulder press is an excellent way to target all the muscle groups of your shoulders.
One thing to remember is that many people have past injuries at their shoulders, or have lost mobility in their shoulders over time.
Focus on your form and do what you can—if you can’t move through a full range of motion, just know that’s something you can work toward gradually.
How to do a seated water bottle shoulder press:
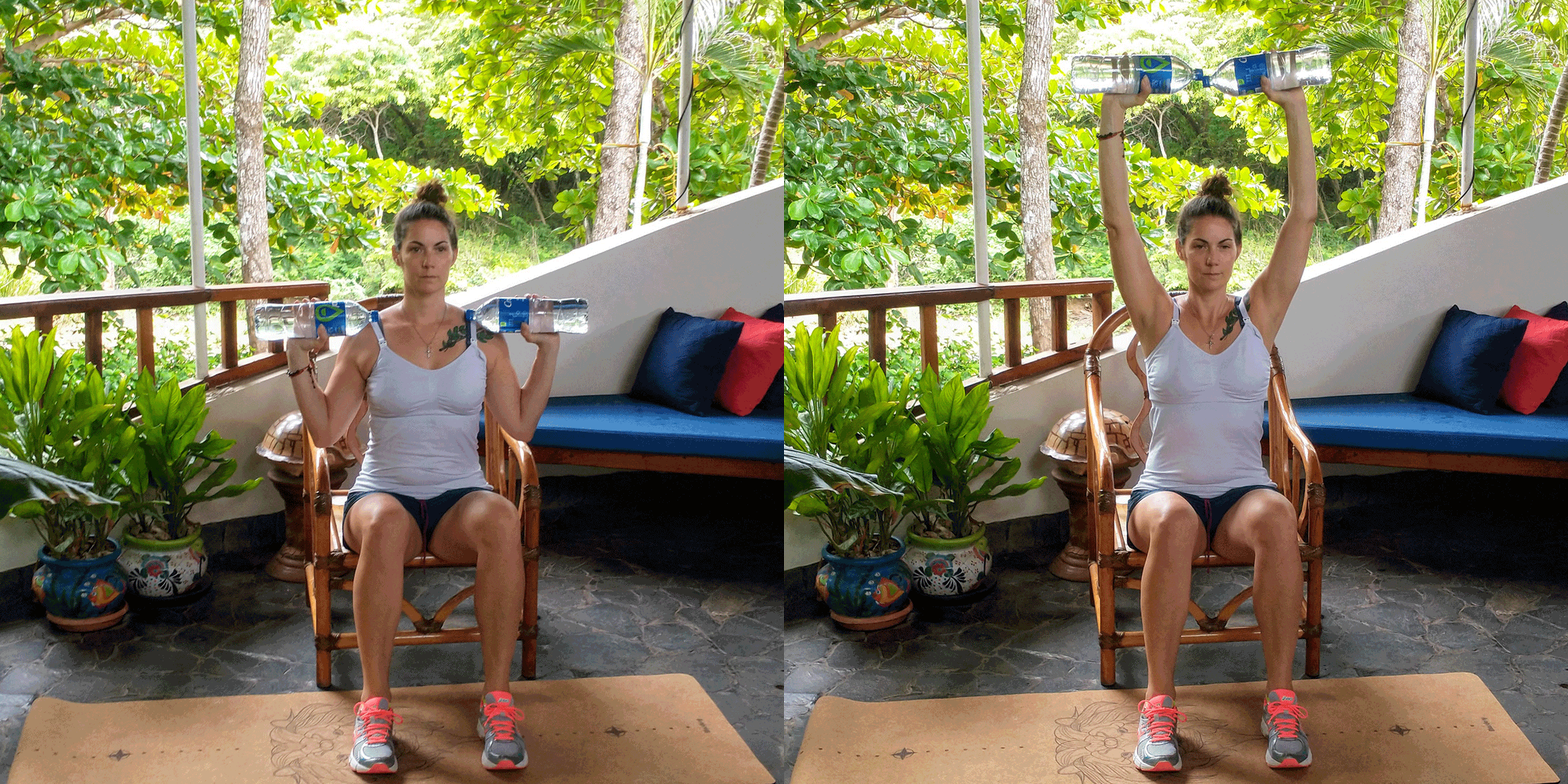
Sit in a sturdy chair, your feet flat on the floor, hip-distance apart, a water bottle in each hand. Engage your core and check your posture—your ears should align with your shoulders and hips.
“Rack” the water bottles at your shoulders with your elbows bent, your palms facing forward.
From here, press your arms straight up toward the ceiling, extending your elbows fully. With your arms fully extended, the water bottles should almost touch above your head.
From here, carefully reverse the movement and lower the water bottles back to your shoulders. Complete two sets of eight to 12 repetitions.
(Get impressive shoulders with these moves.)
Lying water bottle triceps skullcrusher
To target the triceps, which run along the backs of your arms, you can use a single water bottle held between both hands, horizontally, to perform the lying triceps skullcrusher.
How to do a lying triceps skullcrusher:
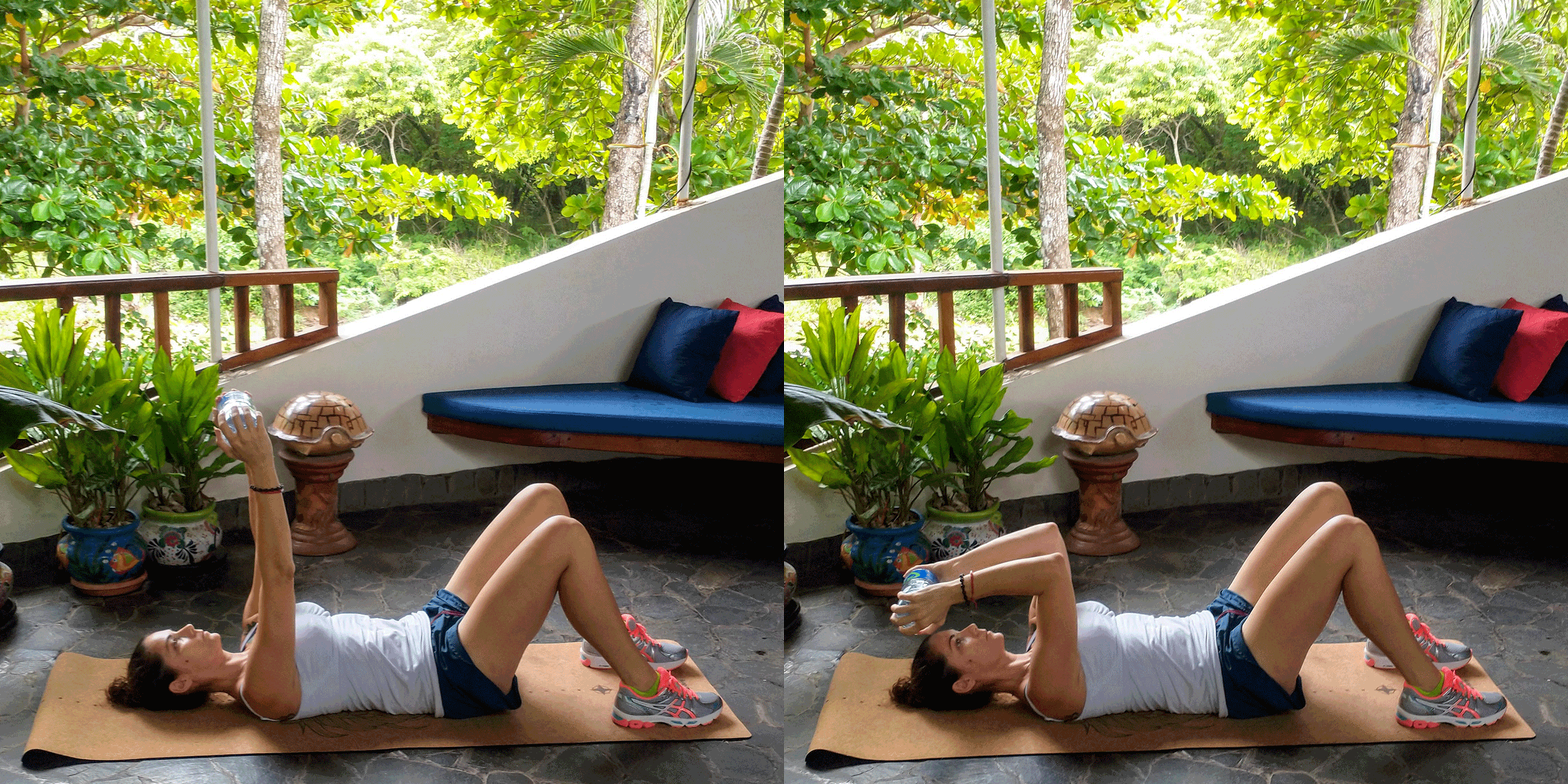
Lie on your back with your knees bent, your feet flat on the floor. Hold a water bottle between both hands at your chest.
Engage your core and press the water bottle straight up from your chest, so your arms are forming an “11.” Keeping your upper arms completely fixed, bend your elbows to lower the water bottle toward your head.
When your elbows have bent to 90 degrees or slightly more, reverse the movement, engage your triceps, and press the water bottle back to the starting position. Perform two sets of eight to 12 reps.
Water bottle biceps curl
To target your biceps, which run along the fronts of your upper arms, all you have to do is perform a simple water bottle curl.
How to do a water bottle bicep curl:
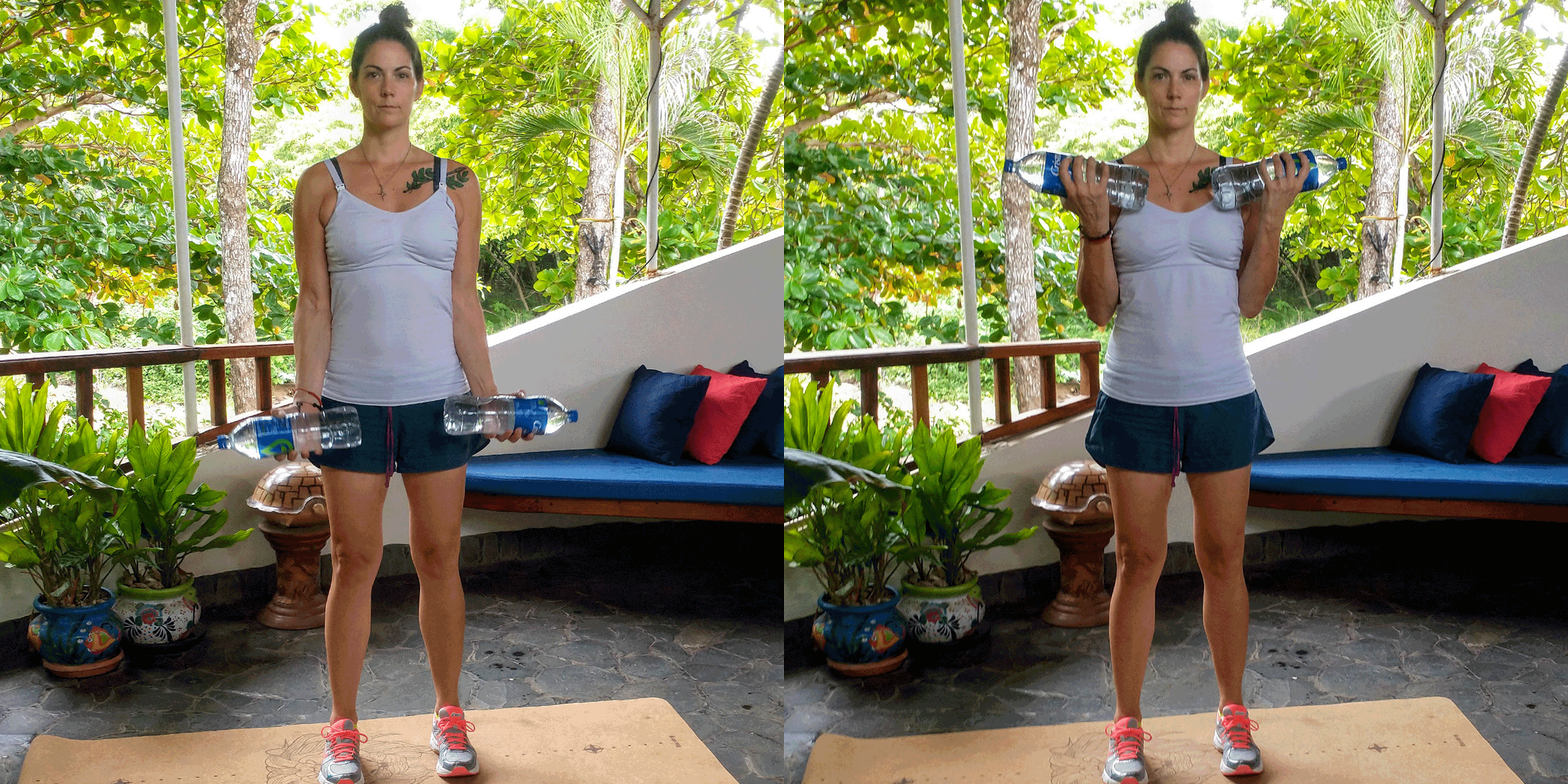
Stand tall with your feet roughly hip-distance apart, your knees slightly bent, with a water bottle in each hand.
Engage your core and check your posture—your ears should align with your shoulders, hips, knees, and ankles. Draw your elbows to your sides and rotate your palms, so they’re facing forward.
From here, keeping your upper arms “fixed” to your sides, engage your biceps and bend your elbows, drawing the water bottles to your shoulders. Reverse the movement and return the water bottles back to the starting position. Perform two sets of eight to 12 reps.
(Build your arm strength with these arm exercises.)
Dead bugs
The dead bug exercise is a core-targeting move that helps engage your core and build the deep muscles of your abdomen, your transverse abdominis.
It makes a great beginner move because your core remains stable throughout the exercise with only your arms and legs moving. This helps reduce the strain on your low back.
How to do a dead bug exercise:
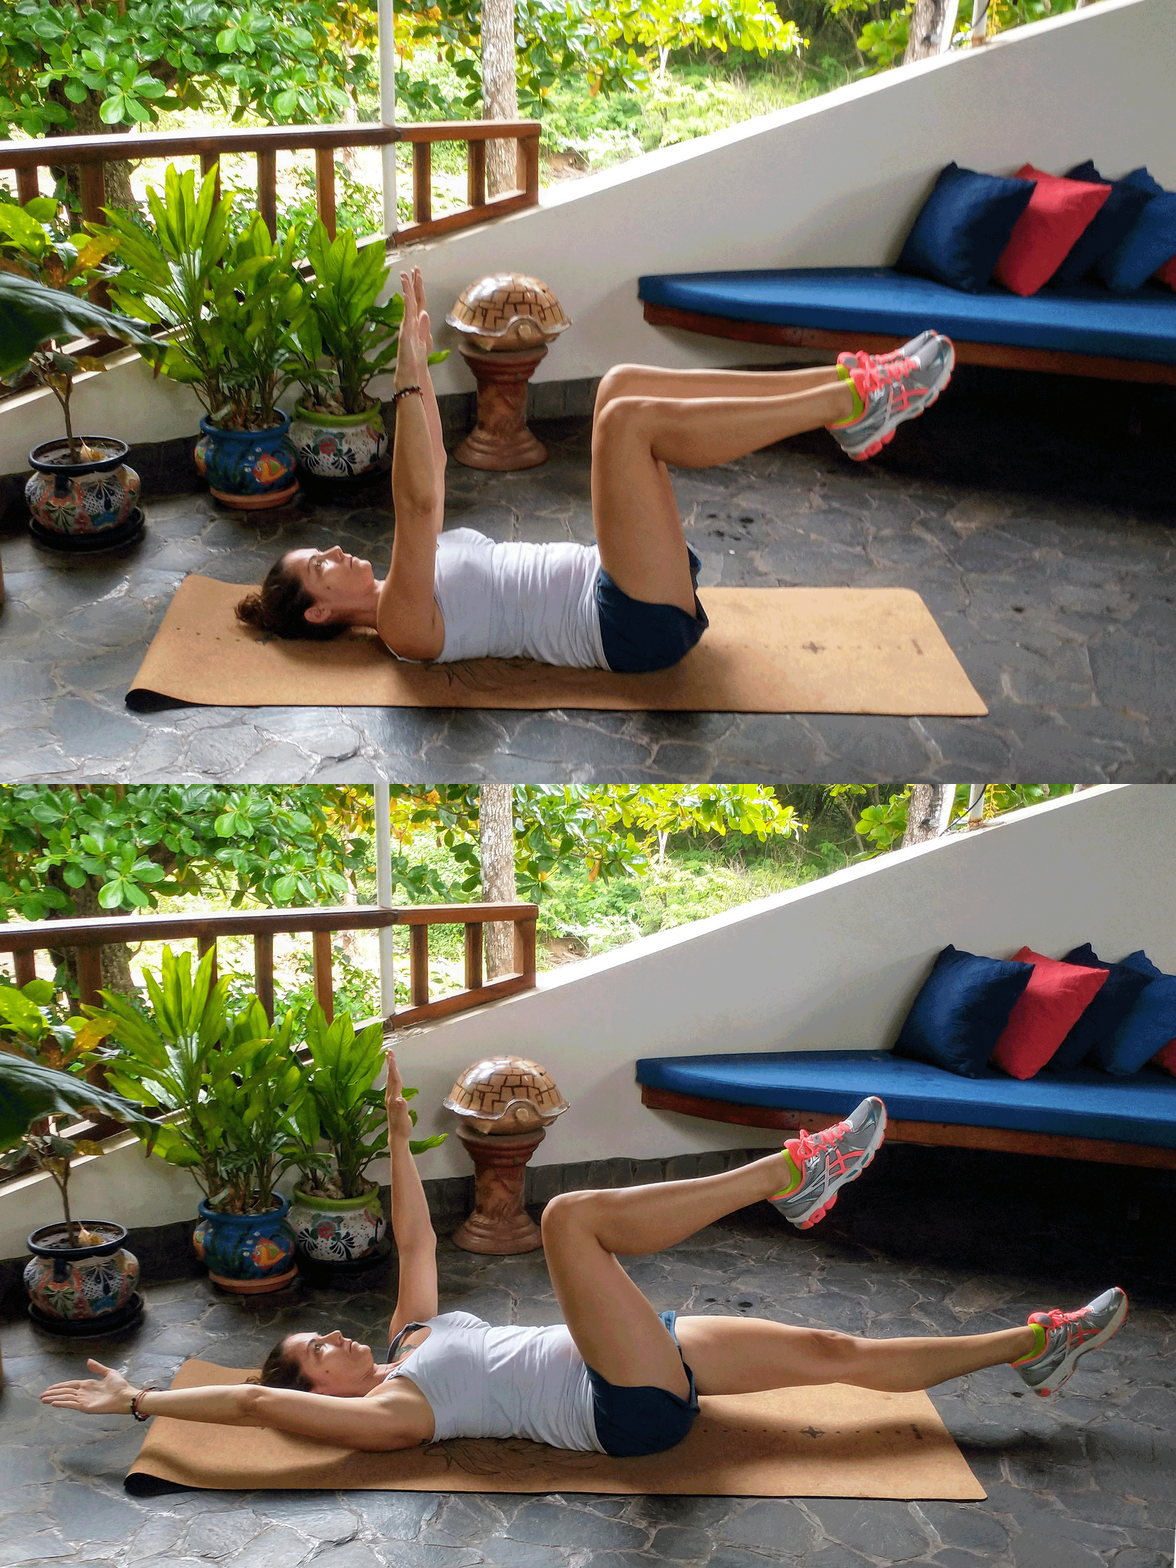
Lie on your back, your knees bent, feet on the floor, your arms at your sides. Engage your core and press your low back into the ground. Lift your feet from the floor until you’ve formed 90-degree angles at your hips and knees.
Check and make sure your knees and feet are hip-distance apart (not touching in the center). Raise your arms and point them straight toward the ceiling from your chest, forming an “11.”
From this position, reach your right arm back and over your head, moving it toward the floor as you simultaneously move your left toes toward the floor while maintaining the 90-degree angle at your knee. You should feel your core engage to control the opposite movements.
If you feel like you can’t keep your low back engaged with the floor, stop and reverse the movement, returning your right arm and left leg back to the starting position. Repeat on the opposite side. Perform three sets of 15 to 20 repetitions per side.
Now that you know these exercises for beginners, check out these abdominal exercises.

