


5 Yoga Poses to Try for Lower Back Pain


Updated: May 24, 2021
Build core strength and spinal flexibility with these expert-recommended yoga poses for lower back pain relief, like Downward-Facing Dog.
The back pain epidemic
Whether your back is just a little achy, or you feel like you can’t stand up from a chair without collapsing in pain, you are not alone. As awful and life-consuming as back pain can be, it’s also incredibly common. According to the American Chiropractic Association, 80 percent of the population will experience back pain in their lifetimes. And according to one study in the journal Spine, 25 percent of adults in the United States experienced back pain in the previous three months.
(Here are surprising reasons for back pain.)
That’s significant. Just look around: At any given moment, one out of every four adults is walking around with some form of back pain. And for acute pain, which is pain that lasts less than four weeks, many people don’t seek medical attention. Rather, they probably do what you’re doing right now. They look for a way to relieve the pain at home. (Check out the best back massagers for lower back pain.)
Yoga poses for lower back pain can offer relief. Here’s how. (Also, here’s how your brain helps low back pain.)
Yoga as movement
It may seem counterintuitive, but moving is the best thing you can do for your body when you’re experiencing pain. Movement and exercise help strengthen and maintain flexibility within your muscles and joints. It also stimulates blood flow and the delivery of oxygen and nutrients throughout your body, which can assist with the healing process.
(Try these exercises for lower back pain.)
One of the beautiful things about yoga is that you can approach the activity with care and caution. You can choose poses or flows that feel comfortable. And you can adjust positions based on your own ability level. It’s also a way to engage in flowing exercise that focuses on balance, flexibility, coordination, and core strength. Together, they may help mitigate your pain.
Granted, a review of 12 trials with over 1,000 people with chronic nonspecific low back pain, suggests yoga offers only small to moderate results as an evidence-based treatment. The study was published in Cochrane Database of Systematic Reviews in 2017. Despite this, many medical professionals still recommend yoga as a home treatment for lower back pain.
“Yoga is a great way to reset the body, to stretch out the back… and it can help alleviate back pain,” says Michael E. Gomez, MD, neurosurgeon and medical director of Minimally Invasive Spine Surgery with Miami Neuroscience Institute.
Talk to your doctor
Before you start any of these exercises, talk to your doctor first to see if they’re suitable for you. Everyone has different degrees of back pain, so it’s important to identify which course of treatment is best for you. Your doctor may also provide some recommendations and help you track your progress.
Yoga poses for lower back pain
Ready to try a few yoga poses at home? Grab a yoga mat and consider the following moves suggested by Dr. Gomez himself.
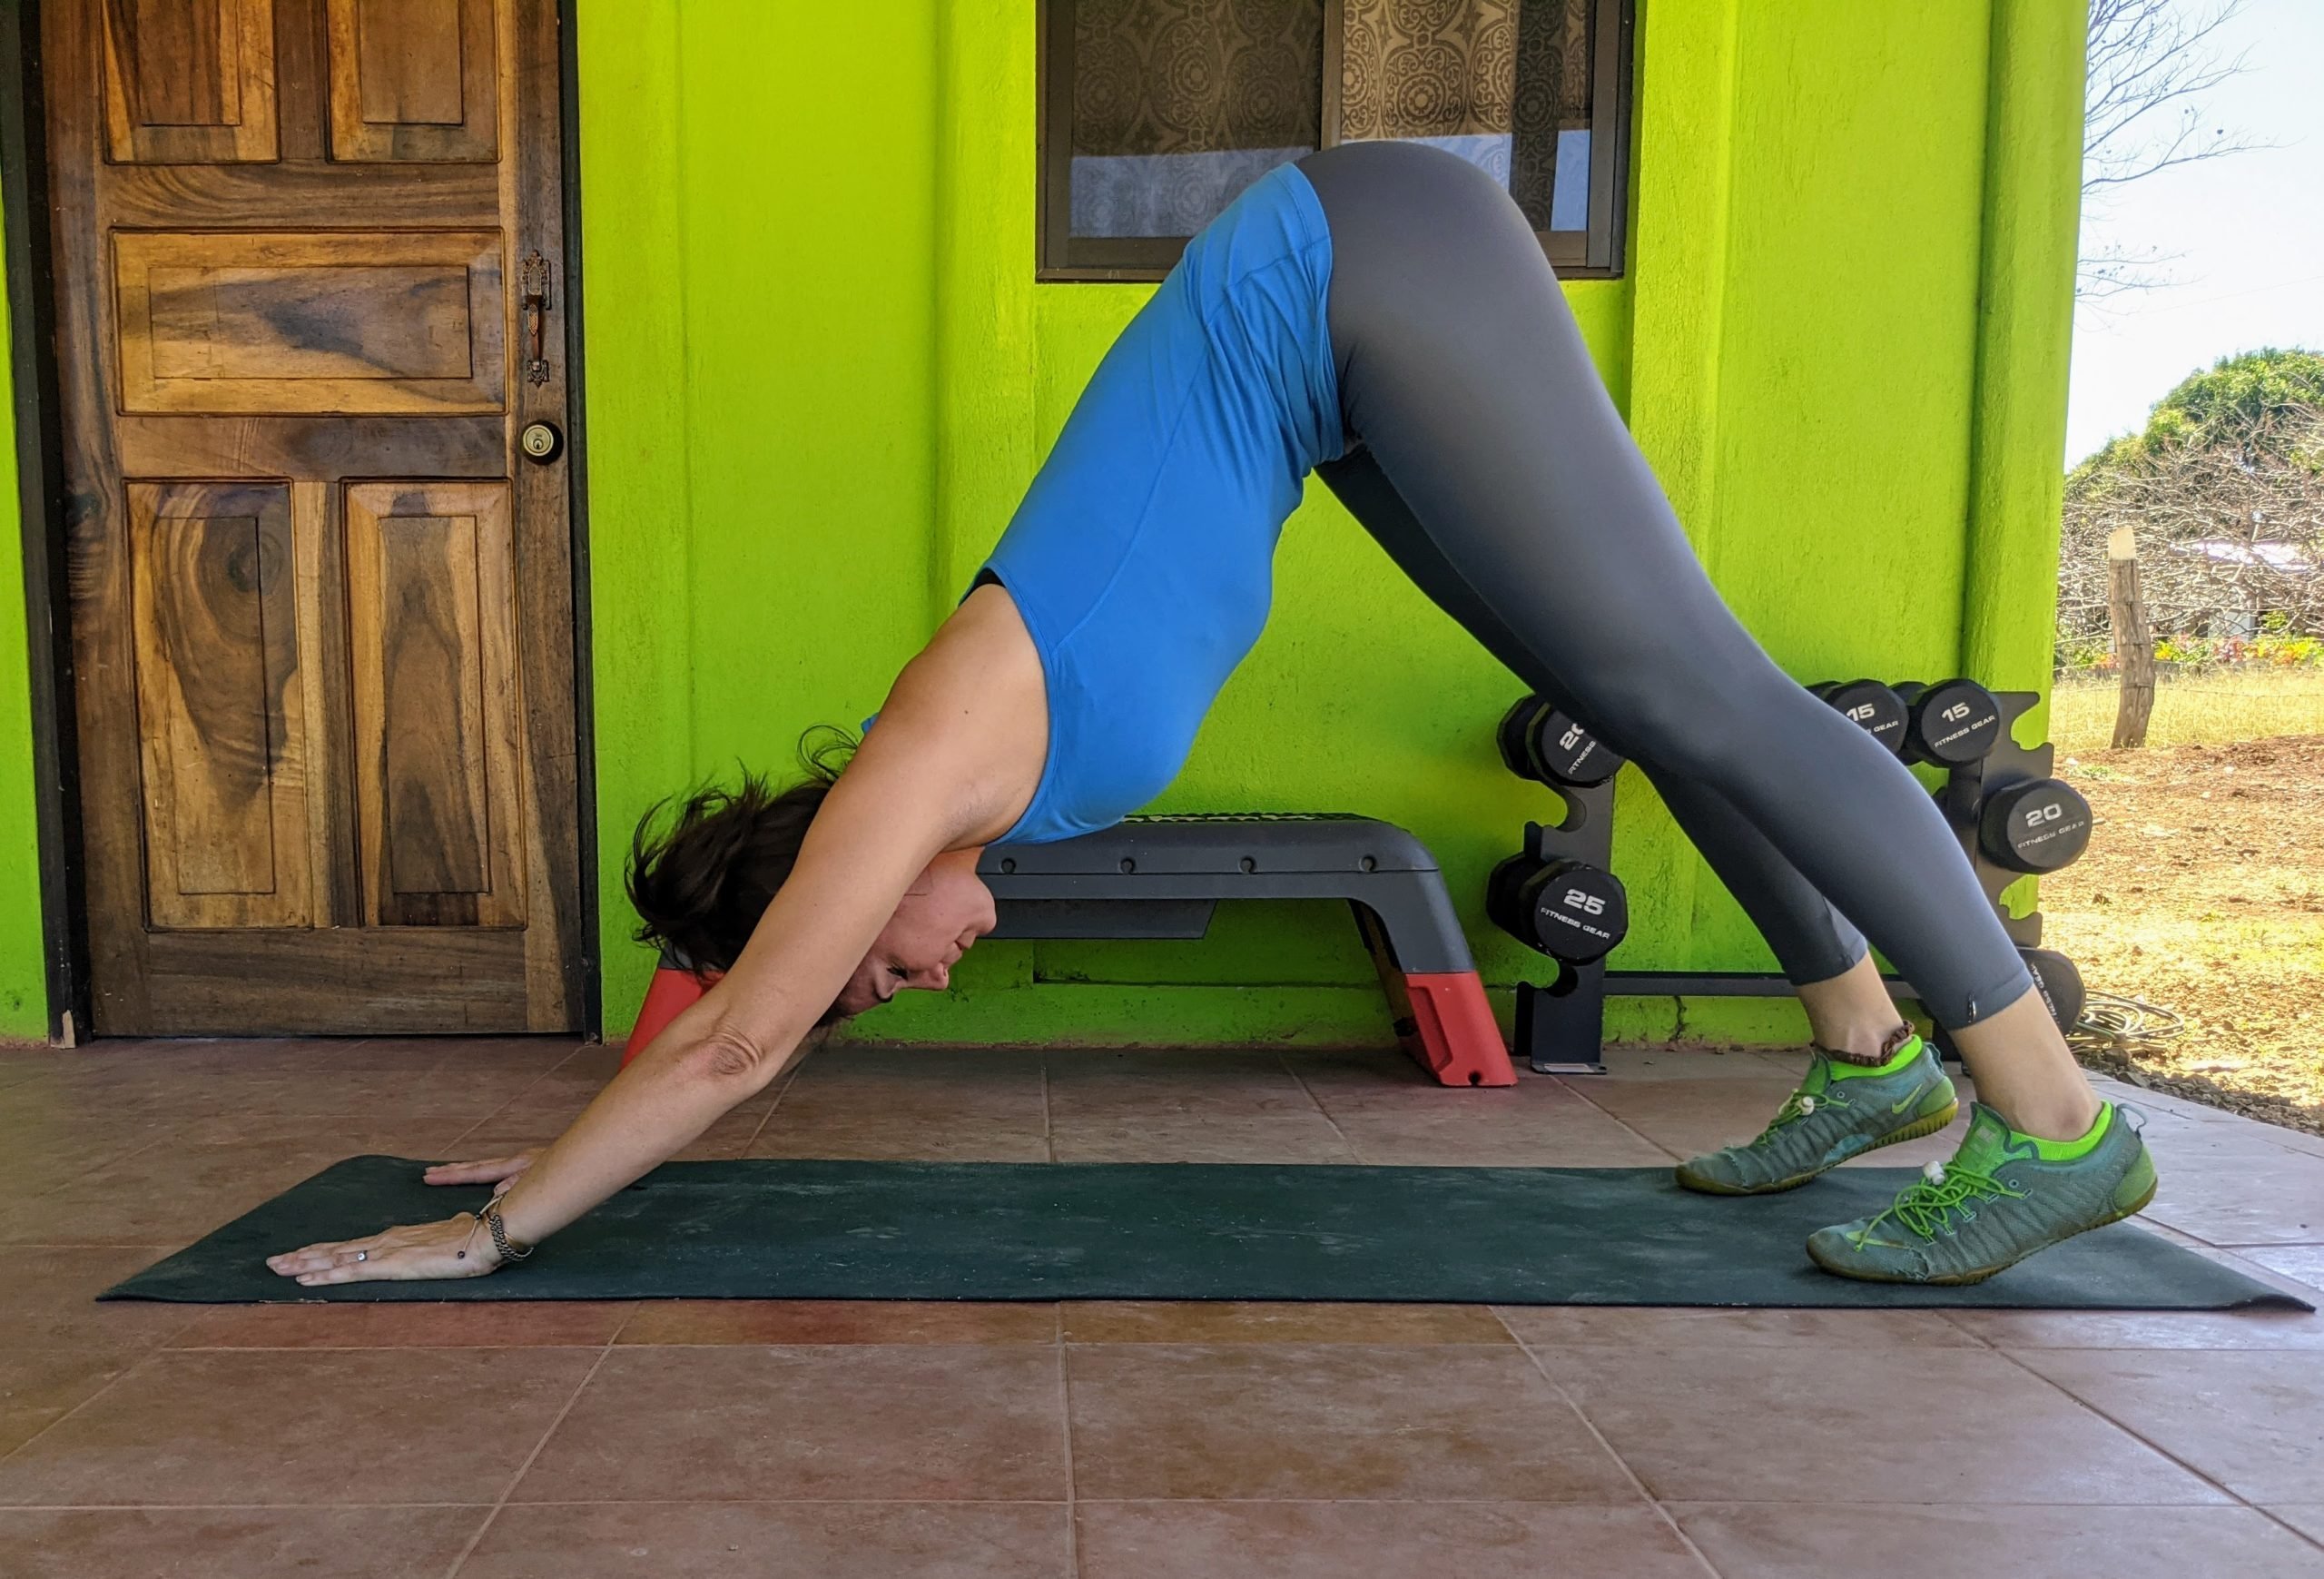
Downward-Facing Dog
Downward-Facing Dog may not be a comfortable pose if you’re in the middle of extreme pain. But, if you’re looking to ward off pain, or if your pain is mild and you’re in need of a total body stretch, down dog is a good place to start. It stretches the glutes, hamstrings, calves, and even the shoulders and upper back.
How to do it
Start in a pushup-like position on a mat, your palms under your shoulders, weight evenly distributed among your limbs, your body forming a straight line from heels to head. Lift your hips high toward the ceiling and extend through your shoulders to create an upside-down “V” with your body. As you reach your hips up, you’ll feel a stretch through your hips, hamstrings, and calves. It’s OK to bend your knees if the stretch is too much. You can also “pedal out” your feet to further stretch your calves. Just press one heel toward the floor as you bend the opposite knee.
Hold the position for three to five deep breaths, allowing your head and neck to relax and hang loosely between your shoulders. Move back into the pushup position, hold for a breath, then repeat. Continue for 30 to 60 seconds.
(Try these natural back pain remedies approved by experts.)
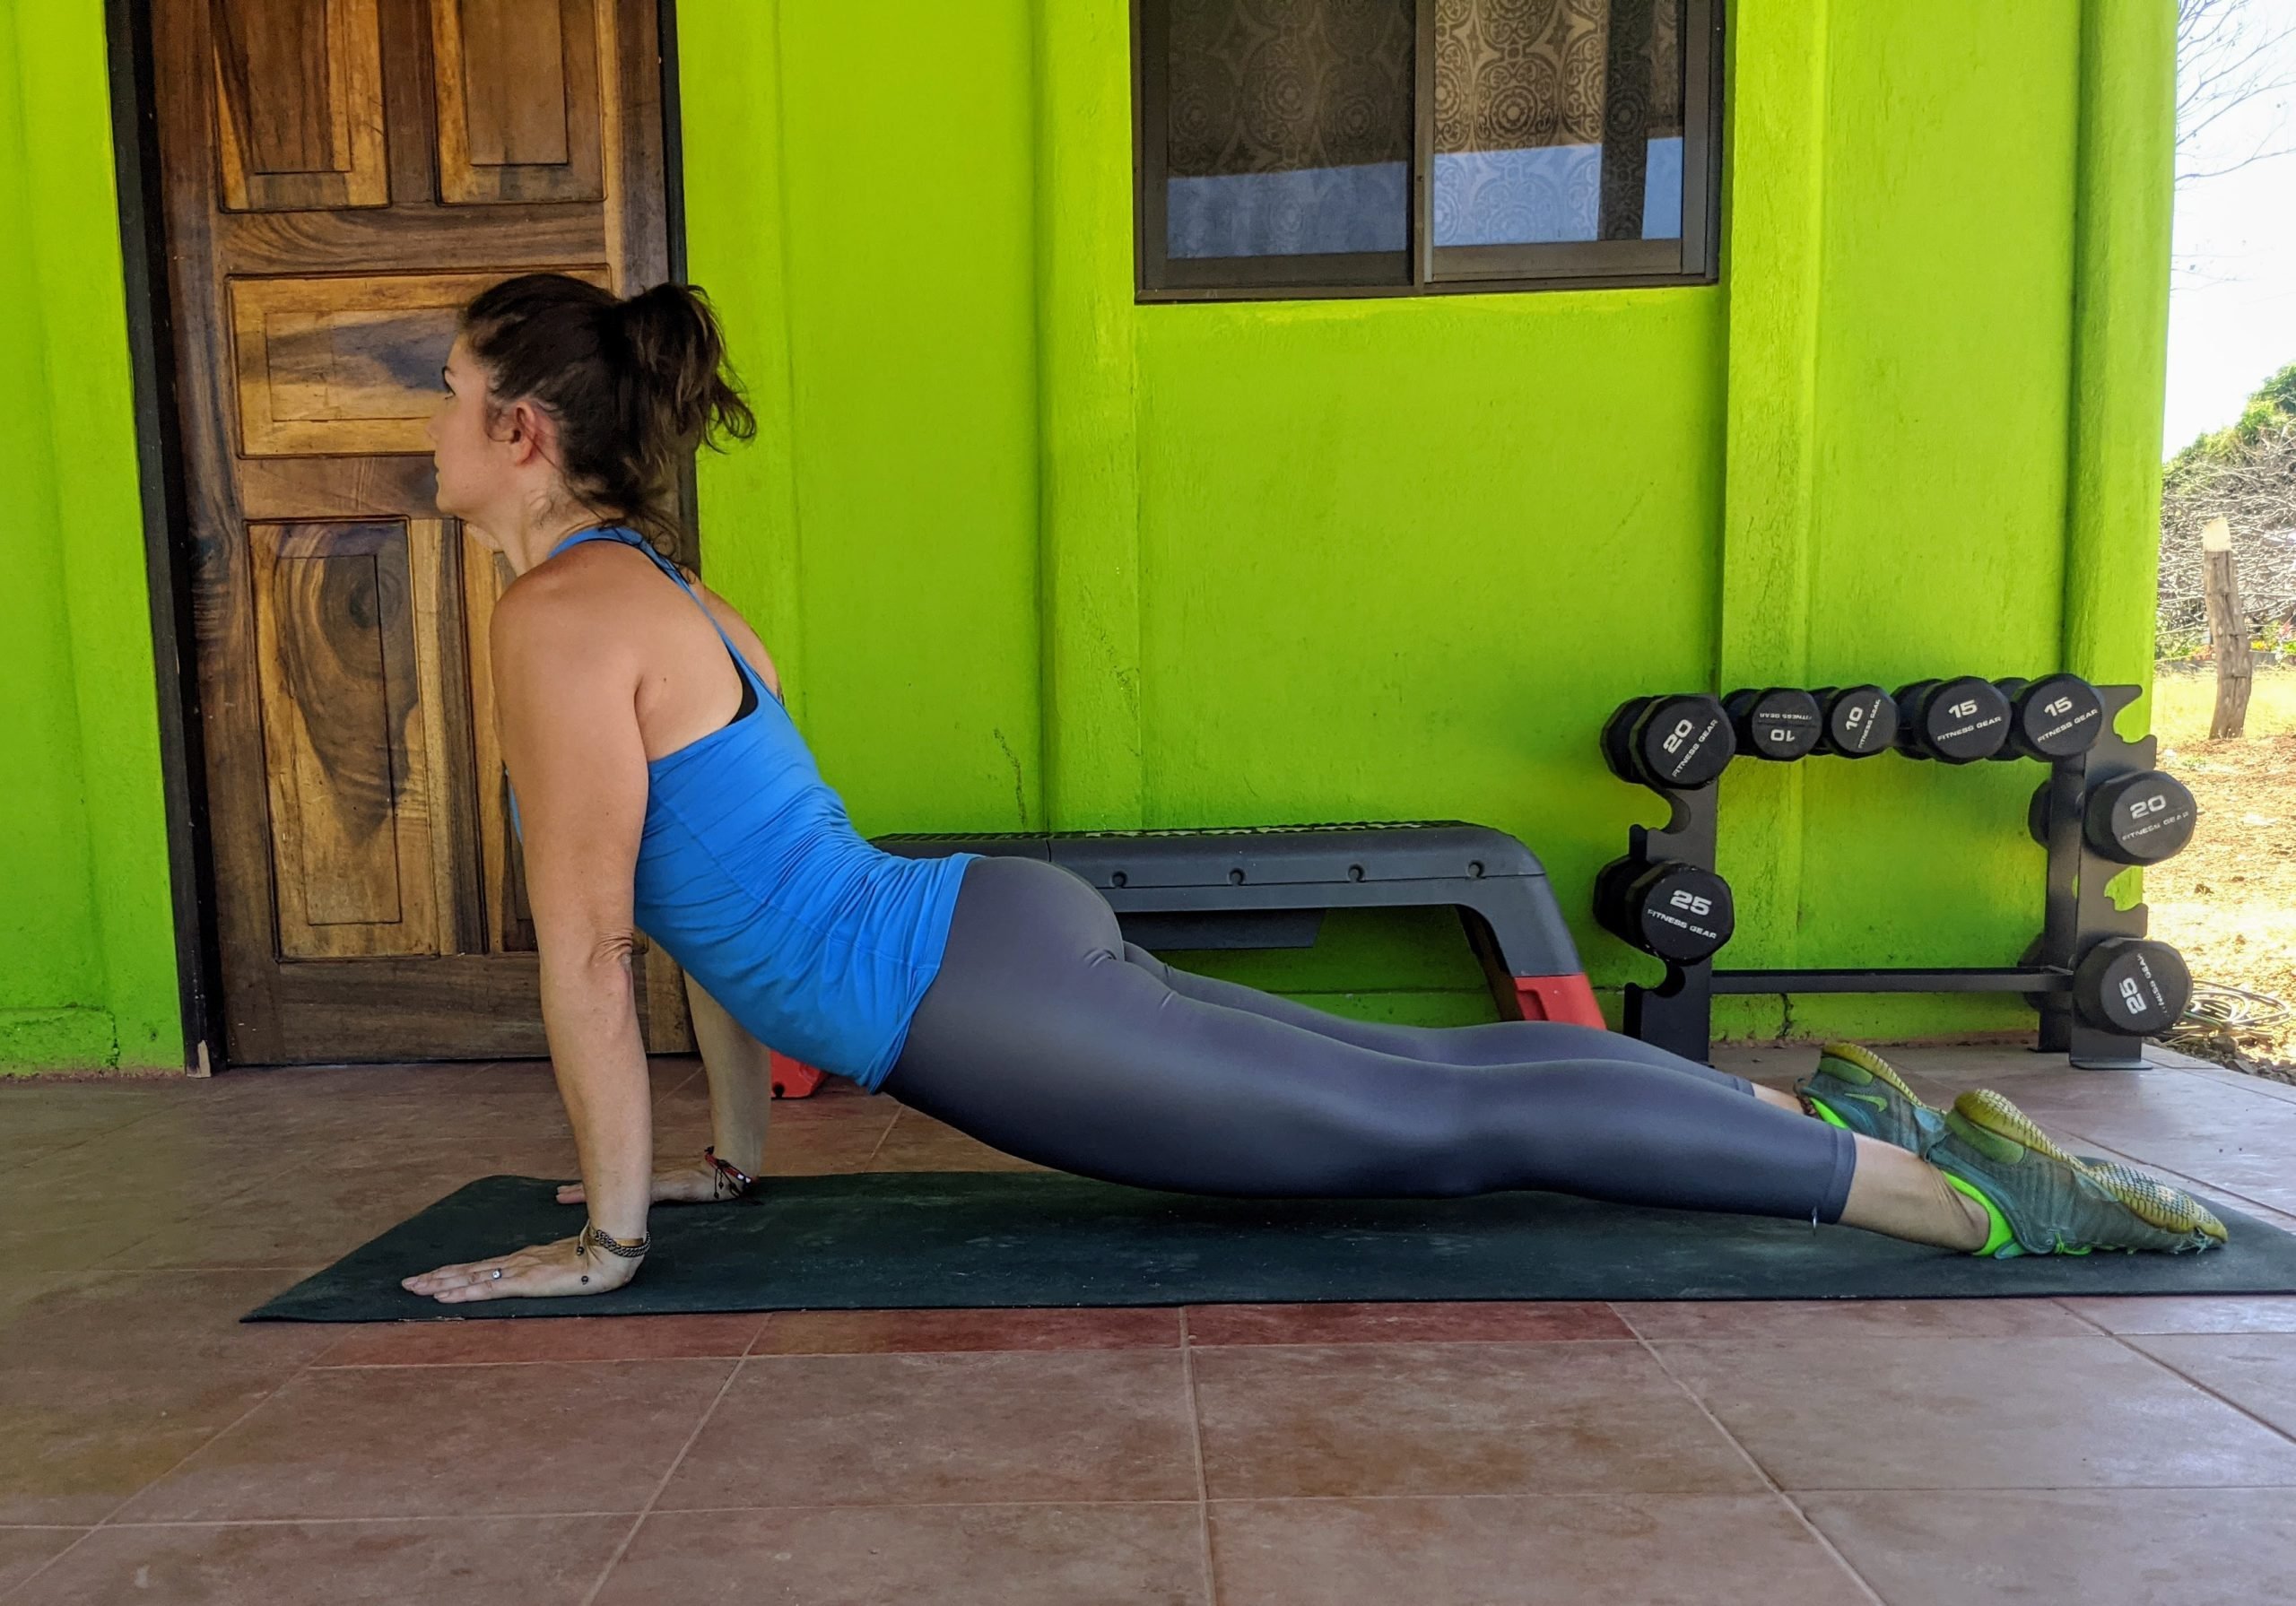
Cobra or Upward-Facing Dog
If you’re new to yoga and in the midst of low back pain, Upward-Facing Dog may be a bit too much for you to handle at first. This is because it requires a full back extension. But it’s this very back extension that may ultimately help relieve back pain.
“Moving—stretching—into extension is the most beneficial direction of movement for the majority of people with lower back pain,” says chiropractor Jordan Duncan, DC, owner of Silverdale Sport & Spine in Silverdale, Washington. “Positions, movements, or stretches that involve lumbar flexion (rather than extension) have been shown to be less beneficial for those with lower back pain.”
Rather than dive into the upward dog pose, start with its beginner version: the Cobra. As you feel more comfortable, increase the back extension to a prone press up, and with time, a full Upward-Facing Dog. (Psst, here are the secrets of women who exercise every day.)
How to do it
To perform the Cobra, lie face down on your mat, your legs fully extended. Place your palms flat on the mat by your shoulders. Engage your abdominals and spine, and use them to lift your shoulders and chest away from the mat. Use your forearms and palms to guide you.
As you lift, slide your forearms and palms forward, so your elbows end up directly under your shoulders. Hold the position for three deep breaths, and return to the starting position. Repeat for 30 to 60 seconds.
Progress to a prone press up by keeping your palms at your shoulders. As you lift your torso, press through your palms to fully extend your elbows. To try a full upward dog: Start with the prone press up. Engage your quads and glutes, press through the tops of your feet, and lift your hips and quads from the mat. Be sure to fully support the back extension with your palms and feet. As with the Cobra, hold these more advanced versions for three deep breaths. Try to relax your shoulders away from your ears as you retract your shoulder blades and continue engaging your core to hold the position.
Release to the mat in a controlled fashion. Take one to two breaths. Then repeat for a total of 30 to 60 seconds.
(Have trouble falling asleep? Try these yoga stretches for better sleep.)
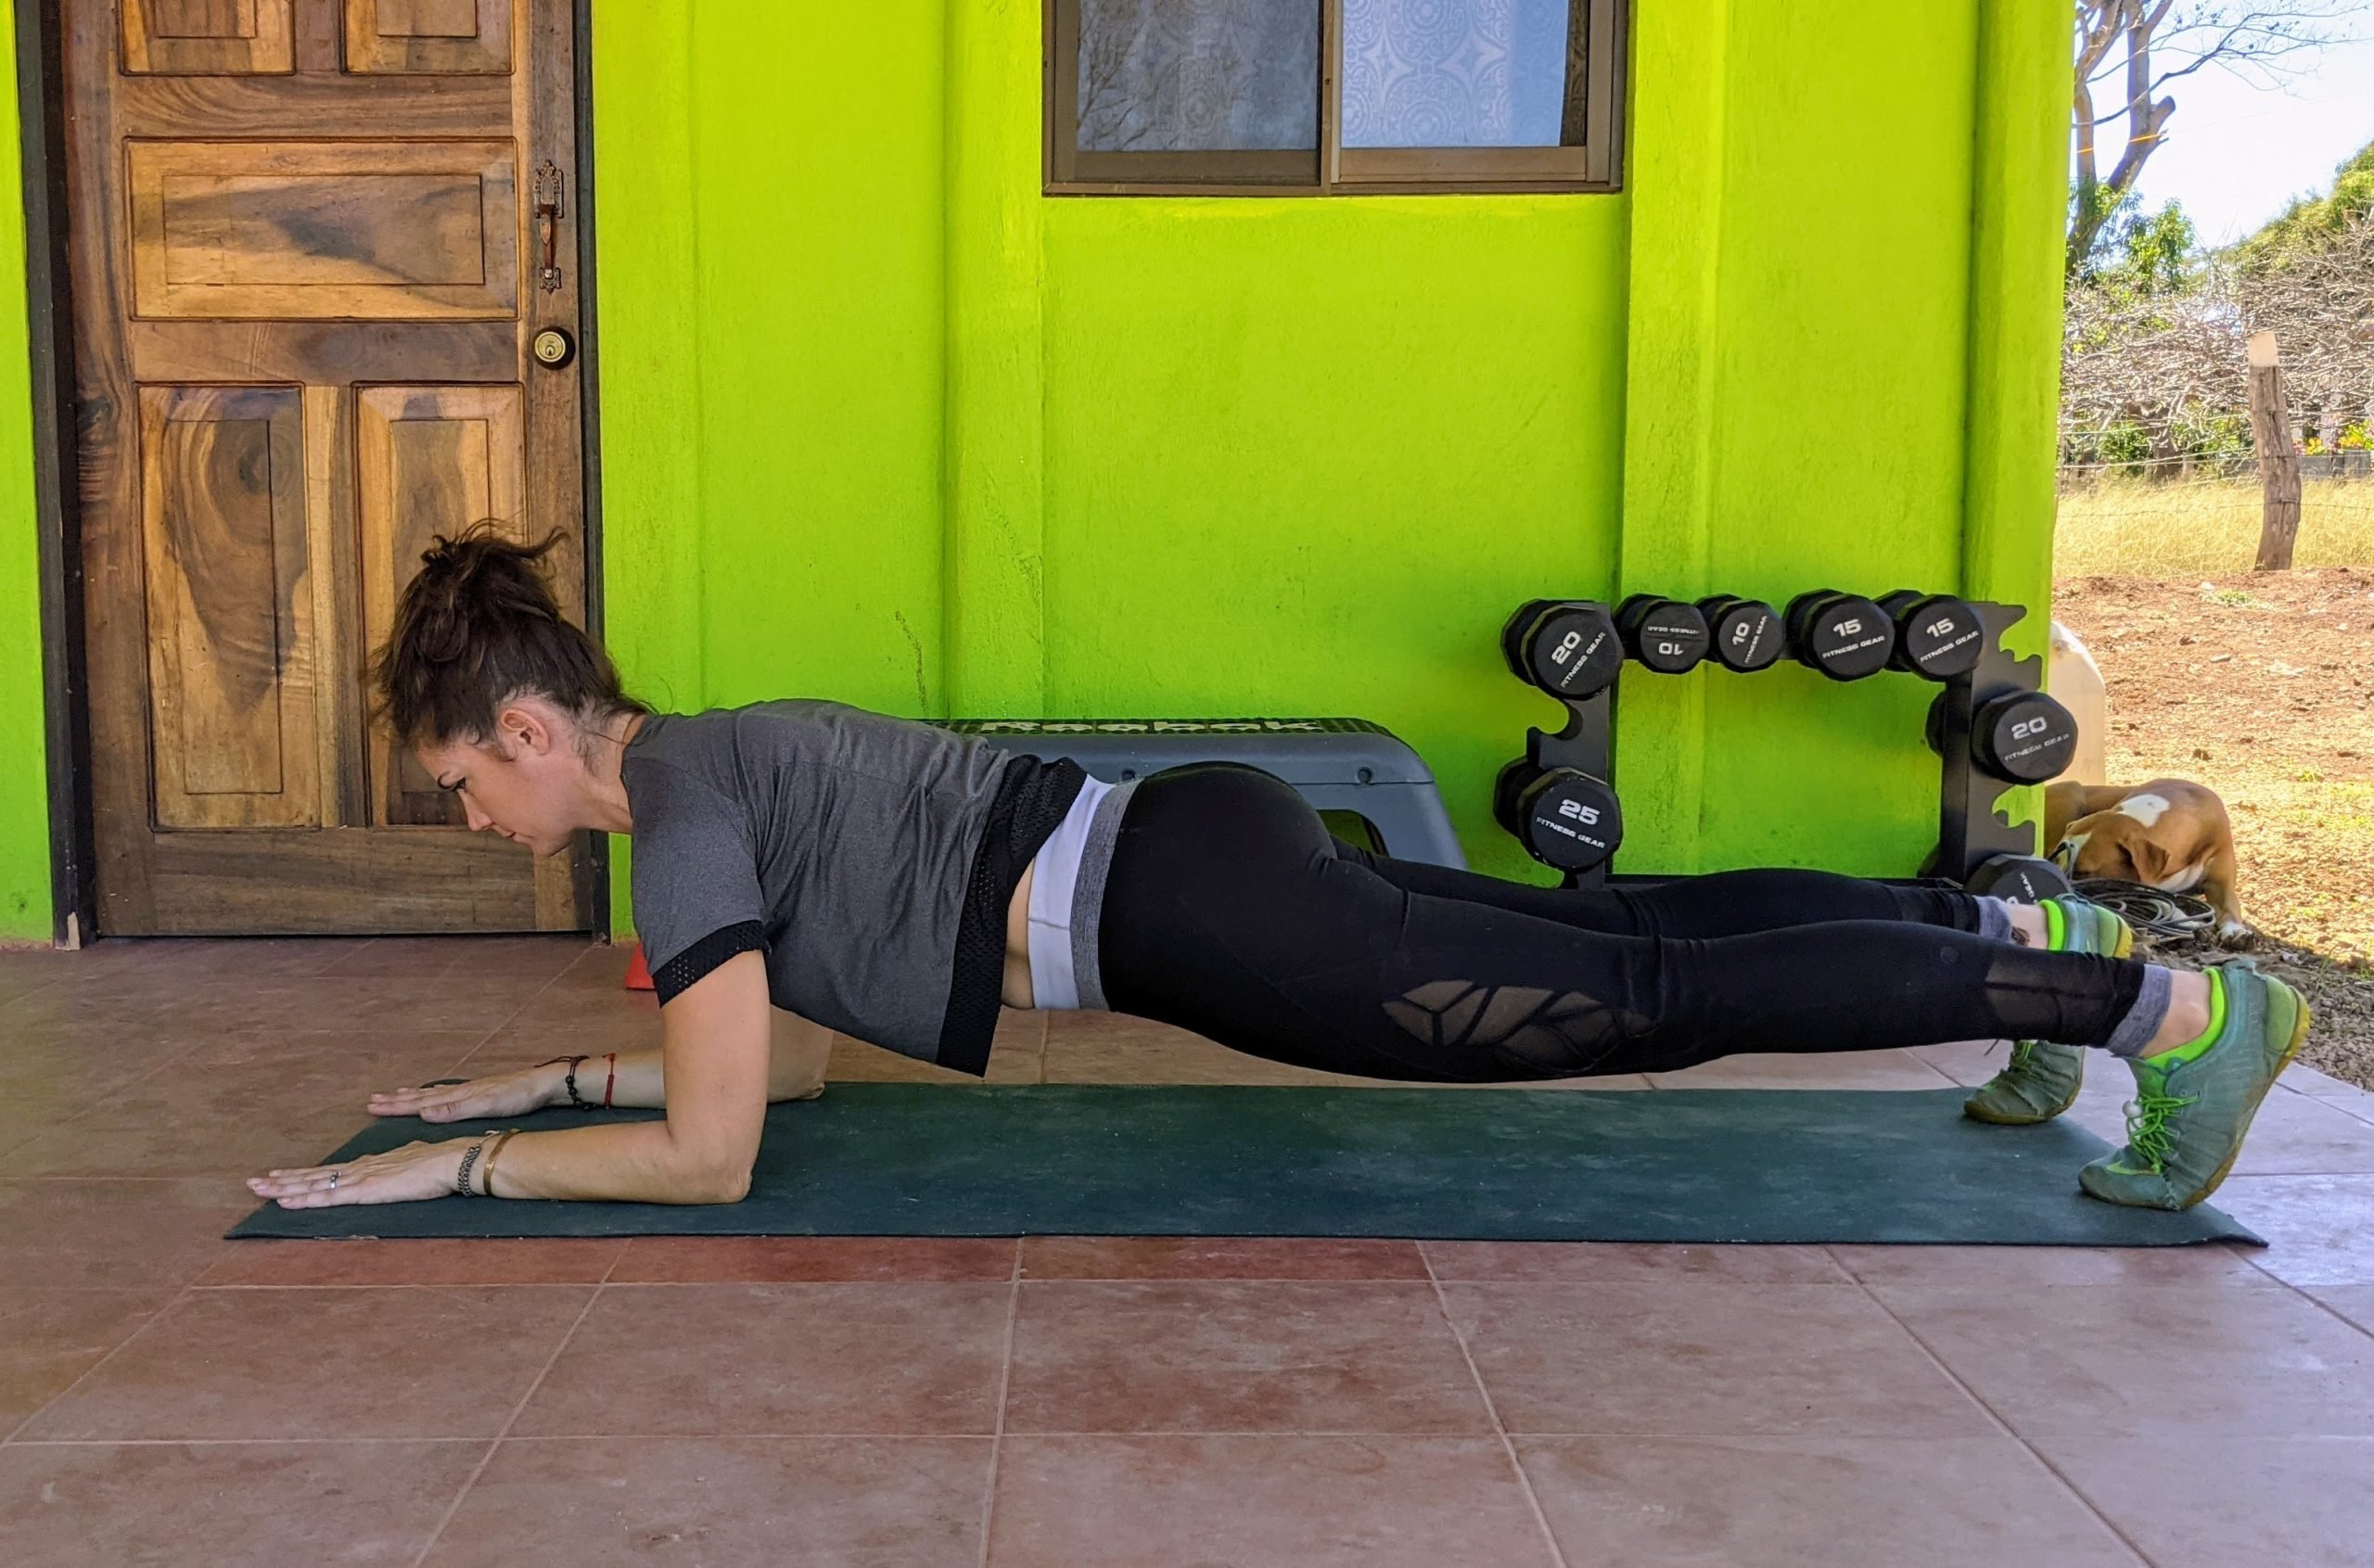
Plank
Plank pose is a good yoga pose for back pain for several reasons. First, it helps strengthen your core—including your abs, low back, hips, and chest—which also translates to improved posture and better movement patterns. But it’s also a good pose to help you transition from one movement to the next, achieving a neutral position between poses that offer more flexion and extension.
Basically, it can help you “reset” between other poses. You can use the high Plank (on your palms) or low Plank (on your forearms) as you see fit. (Here’s how long to hold a plank to flatten your belly.)
How to do it
To perform a low Plank, start on your knees and forearms on a mat, with your elbows positioned directly under your shoulders, your palms flat on the mat. Engage your core and step your feet back one at a time to balance on your forearms and the balls of your feet. Check your body positioning—you should be able to form a straight line from your heels to your head, preventing your low back from sagging toward the floor or your hips from pressing up toward the ceiling.
Hold the position for three to five deep breaths and lower your knees to the floor. Rest for one breath, then repeat for up to two minutes. To perform a high Plank, place your palms flat on the floor under your shoulders with your elbows fully extended.
You can use the Plank as a “reset” after a Downward-Facing Dog or Pigeon pose.
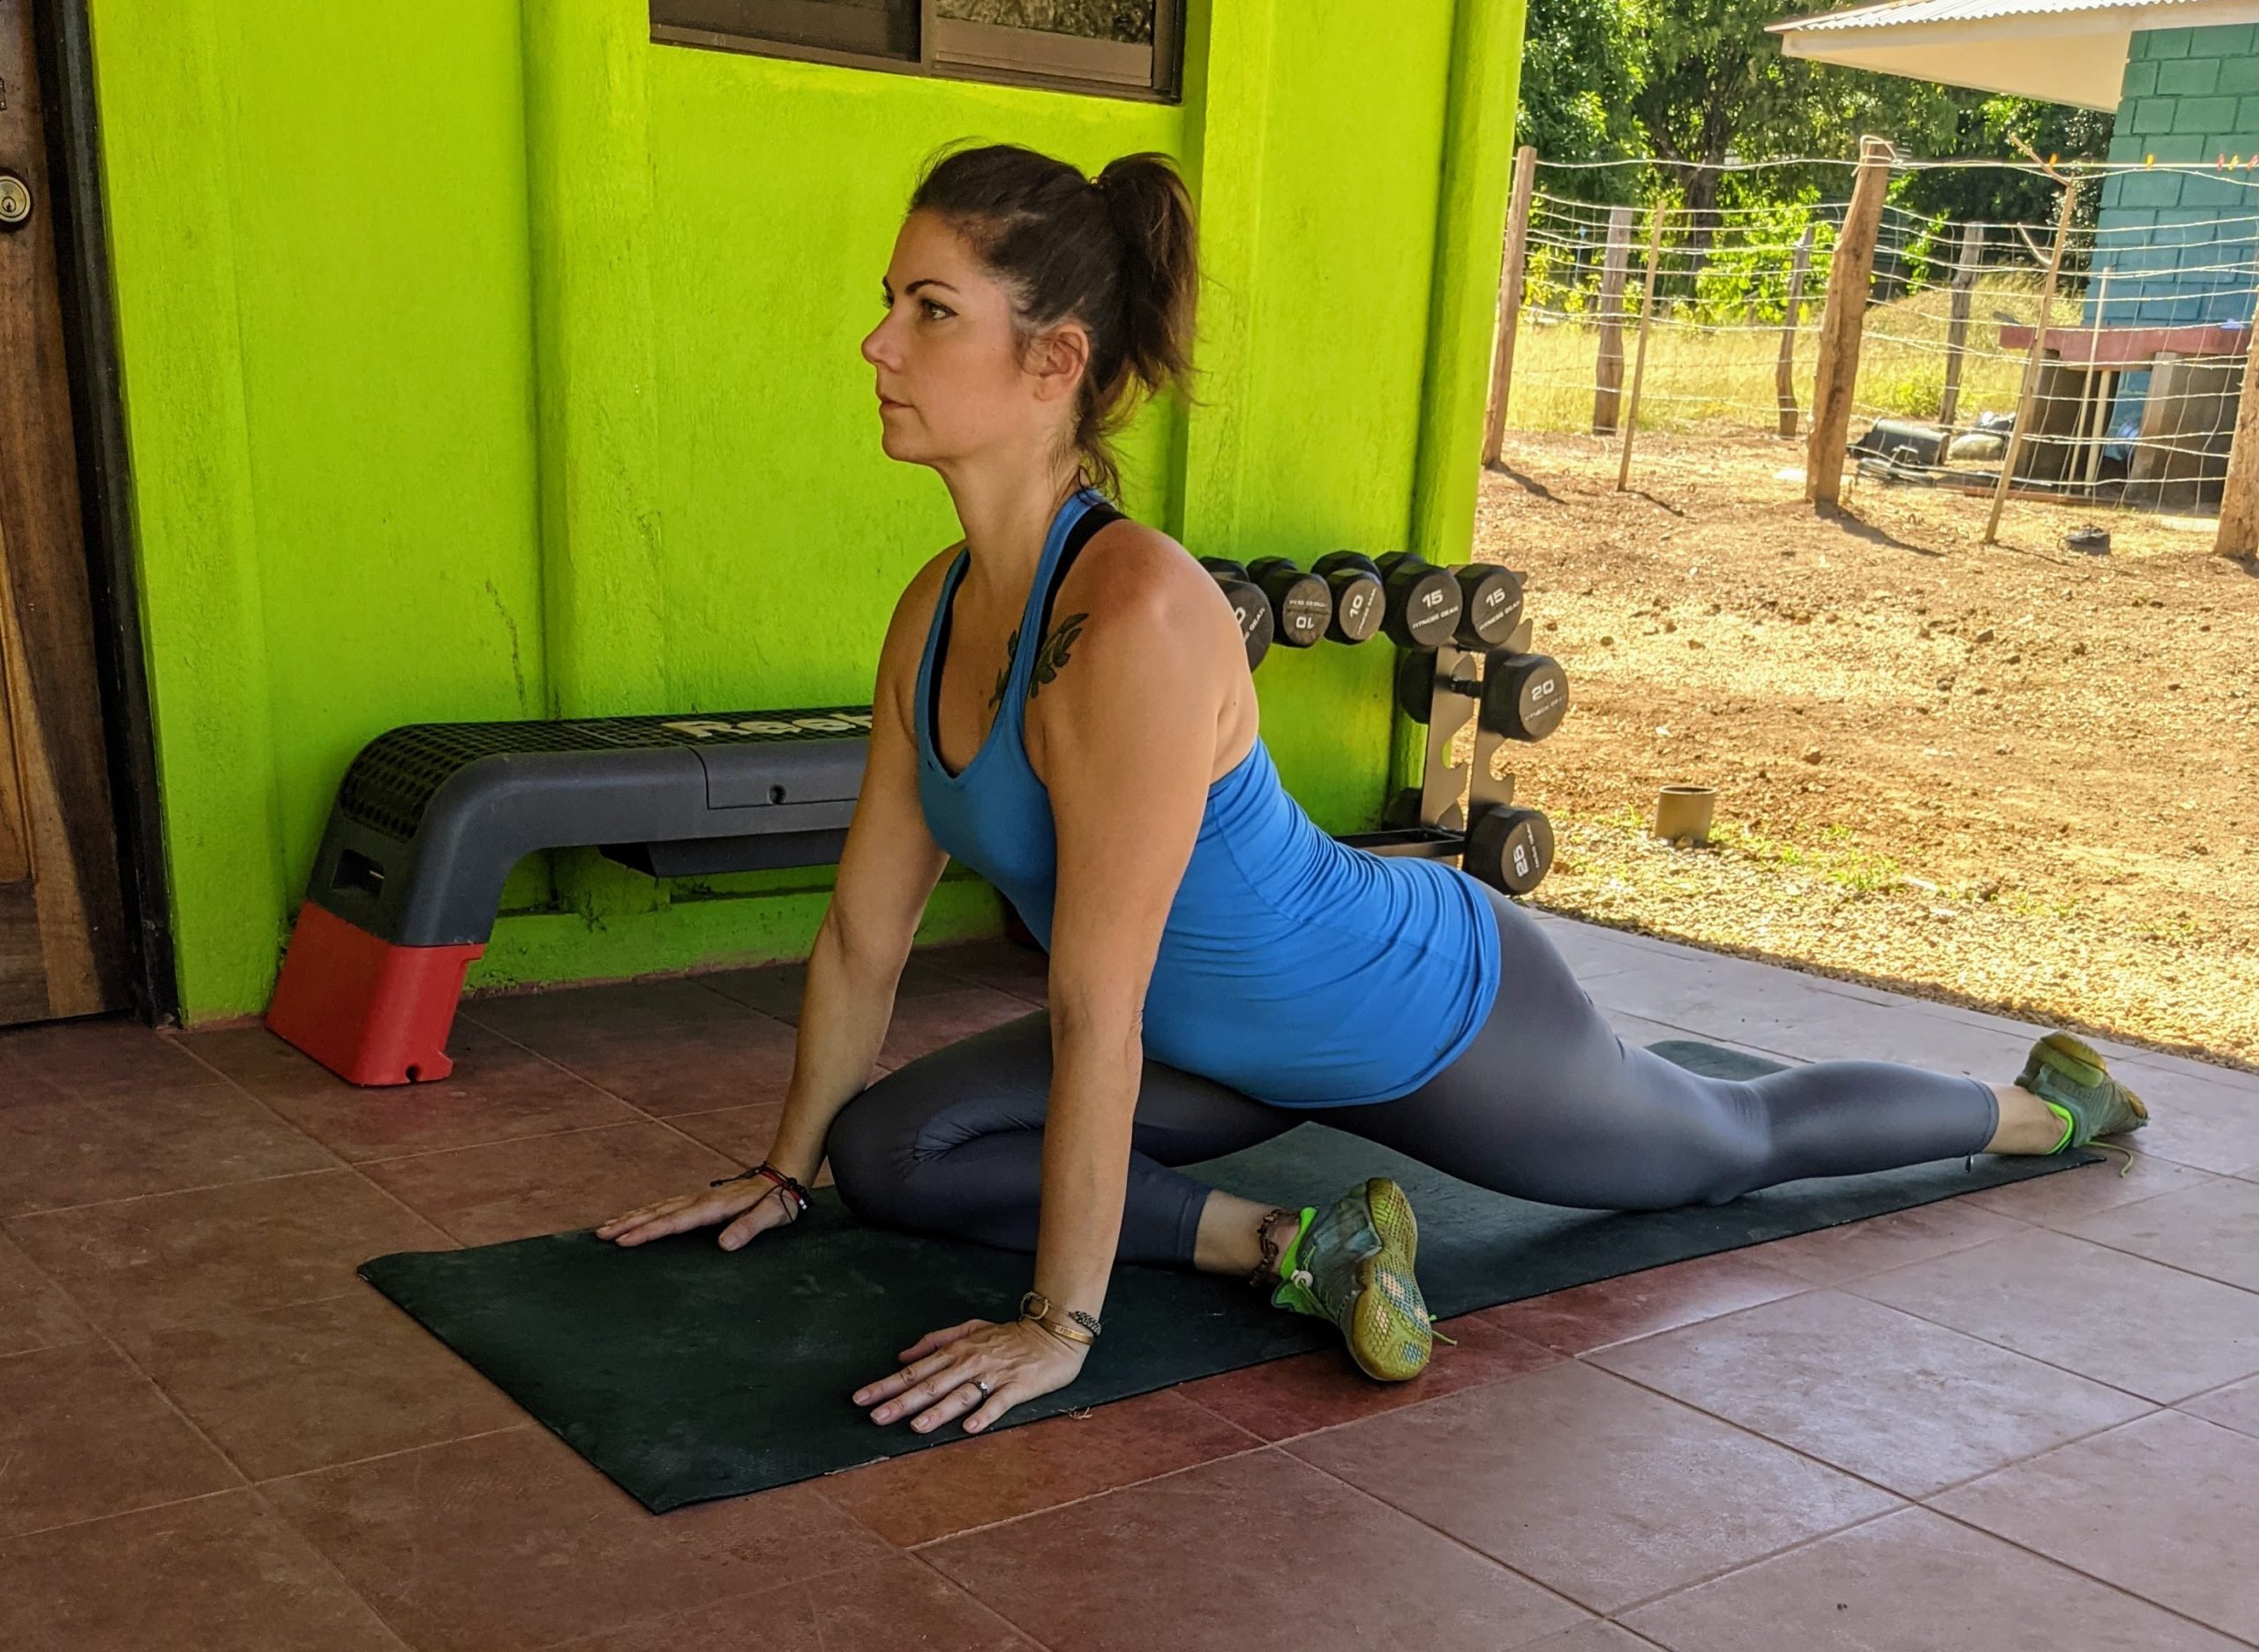
Pigeon
If you think your low back pain may be linked to tight hips, Dr. Gomez suggests the Pigeon. This pose helps stretch the hip flexors and rotators, including common hotspots like the piriformis muscle (in your buttocks) and the psoas muscles. Plus, the beginner version places your low back in extension, which can help improve posture and alleviate pain.
Pigeon pose can be challenging for anyone with tight hips. You should adjust your leg position as needed and use your upper body for support. (If you need another stretch to open your hips, you can try the scorpion stretch.)
How to do it
Start in a high Plank position, balanced on your palms and the balls of your feet, your core engaged. Bend your right knee, drawing it toward your chest as you lift your foot from the ground. Rotate your right hip outward, bringing your right foot toward your left hand, and your right knee closer to your right hand.
Place the outside of your right shin on the ground, angling your right foot and shin as needed based on your flexibility. If you’re tighter, position your right foot closer to your left hip; if you’re more flexible, bring your right foot closer to your left hand. Lower your left knee and foot to the floor and allow your hips to drop as you lift your chest. Draw your shoulder blades down and in toward your spine. You should feel a stretch through the outside of your right hip and along the front of your left hip flexor.
Hold for three to five breaths, reset to a Plank position, and repeat. Continue for a total of 60 seconds on one side before switching to the opposite side.

Figure 4 at the Wall
The Figure 4 stretch is a nice recovery stretch that’s often used in restorative yoga classes or at the end of a more strenuous yoga flow. In this pose, your legs are extended above the torso, which allows gravity to help with passive circulation and lymph flow. This means it can aid in the removal of waste products through your lymph and circulatory systems.
This position also stretches the hamstrings and gives your low back a chance to stretch and relax. When you add a “figure 4” to the pose, you’re also further stretching the outside of your hips and your glutes, which can help alleviate low back pain.
How to do it
Sit with your right shoulder and hip against a wall, your knees bent, feet flat on the floor. Rotate your hips as you move to lie down perpendicular to the wall. Swing your legs upward to place your feet against the wall as you lie back. Extend your legs as much as you comfortably can against the wall (this will vary based on your flexibility—bent knees are fine).
Place your arms on the floor at your sides, and breathe deeply. Every five breaths, try to extend your legs a little bit further, unless they’re already fully extended. After 30 to 60 seconds, bend your left knee and rotate your left hip outward, placing the outside of your left shin across your right thigh. You should feel a stretch in your left glute and the outside of your left hip.
Open your left hip as far as you comfortably can. Hold for 30 seconds before switching legs.
Next, here are some yoga quotes to inspire you on your journey.
- Jordan Duncan, DC, chiropractor and owner of Silverdale Sport & Spine in Silverdale, Washington
- Michael Enrique Gomez, MD, Baptist Health, Miami
- Spine: "Back Pain Prevalence and Visit Rates: Estimates From U.S. National Surveys, 2002"
- Centers for Disease Control and Prevention: "Acute Low Back Pain"
- Cochrane Database of Systematic Reviews: "Yoga treatment for chronic non‐specific low back pain"
- American Chiropractic Association: "Back Pain Facts & Statistics"
Originally Published: February 03, 2021